

| BMW Garage | BMW Meets | Register | Today's Posts | Search |

|
|
|
| 03-26-2016, 01:18 PM | #1 |
|
Captain
 329
Rep 984
Posts |
DIY - F10 N55 JB4 Install PWG
I know burger has a decent install DIY for the N55, but it is not specific to the F10. Please note I did not bother installing the flex-fuel sensor. So here goes my DIY.
1. Disconnect the battery. Pull up the rear flap in the trunk to expose to 10mm plastic nuts. Unscrew nuts. Remove rear trunk liner. Loosen 10mm nut on negative battery terminal and pull off. 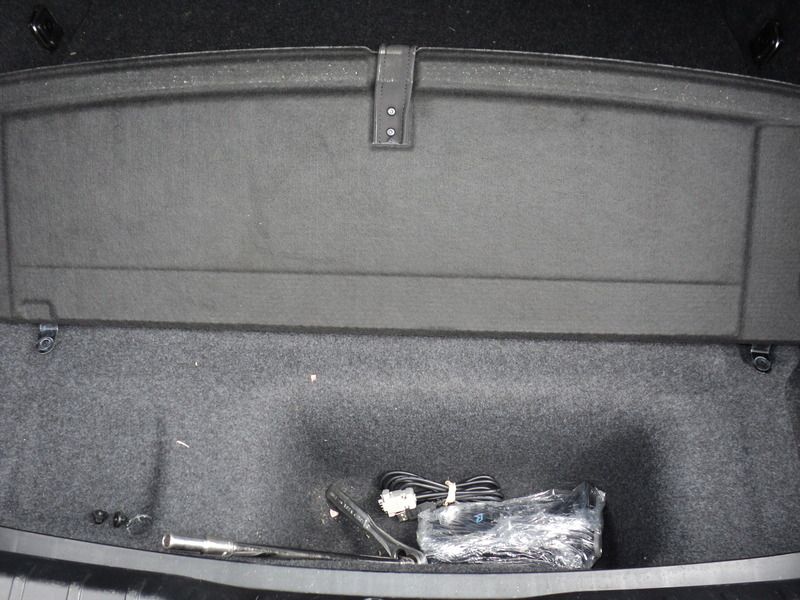 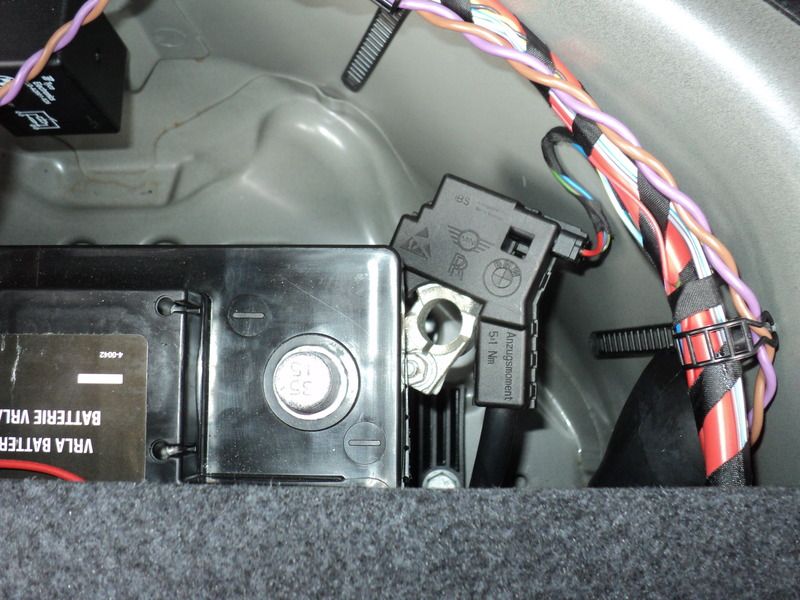 2. Pop the hood. Remove the cowel on the vehicle's right side. There are three plastic pop rivets. Use plastic trim tools or the like. Next pull off the engine cover (pops up and slides slightly forward). 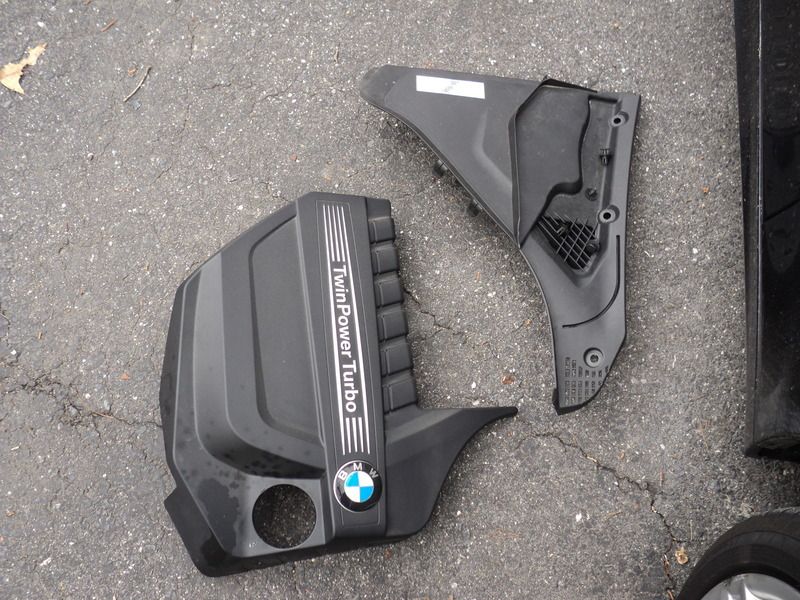 3. At this point, you want to lay out the JB4 along where it will be finally installed. I found that there is not much extra wiring to work with, so you have to put the JB4 pretty close to the inner engine bay seal. I routed it through this seal, and cut off a little bit of excess for it to fit.  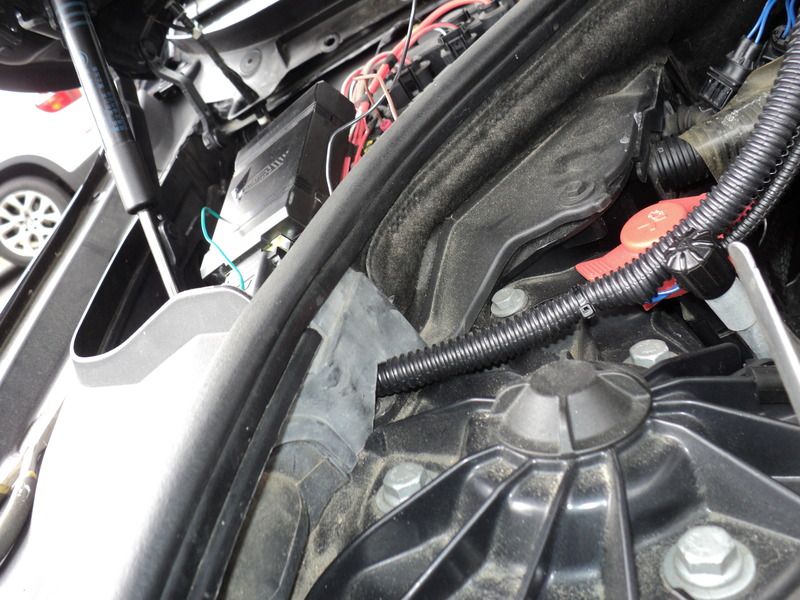 4. Now that you laid out the harness, let's tackle the first plug, the TMAP sensor on the charge pipe. Disconnect the factory plug and install it into the female JB4 connector. Plug the male JB4 connector into the TMAP sensor. 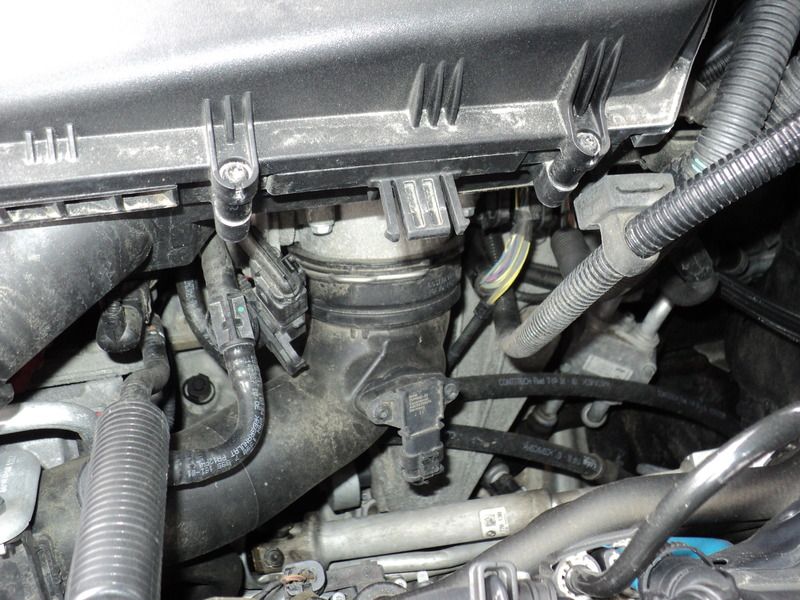 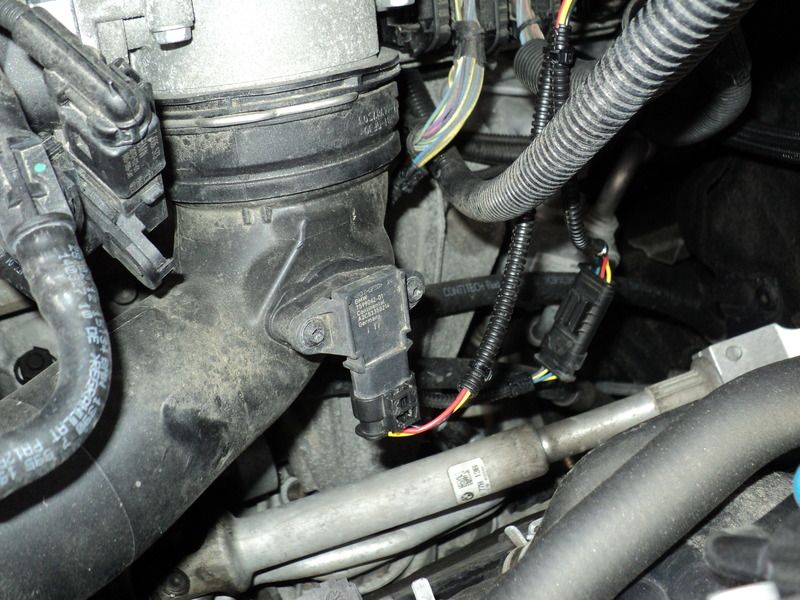 5. Next up is the MAP sensor. This is located behind the intake, so lets pop the top of the airbox off. To do this, unscrew the six T25 bolts. Note they don't actually come out of the top of the airbox, they just sit loose. Next, pull the top of the airbox up to expose the MAP sensor. Disconnect the factory plug and install it into the female JB4 connector. Plug the male JB4 connector into the MAP sensor. 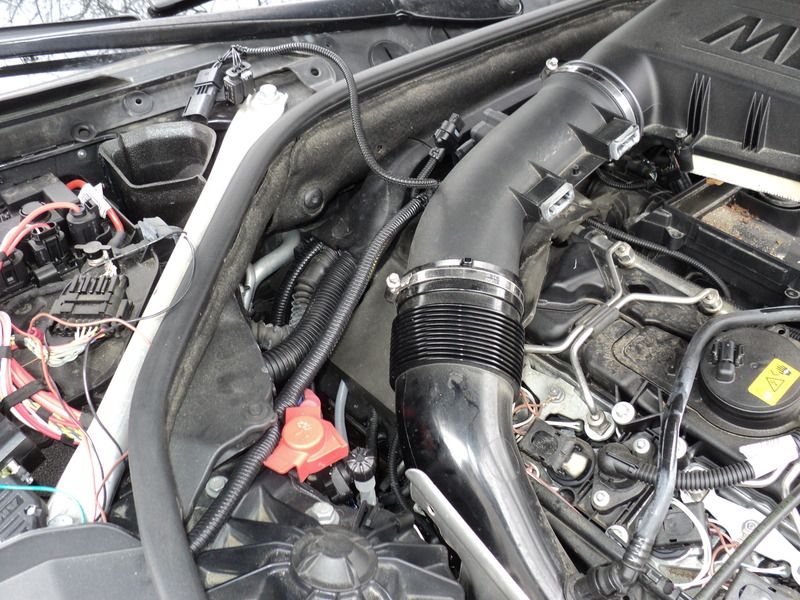 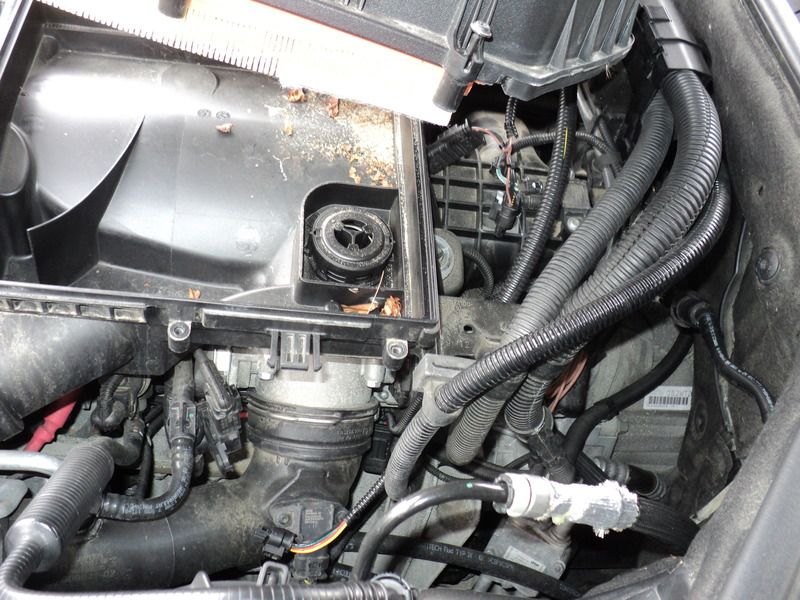 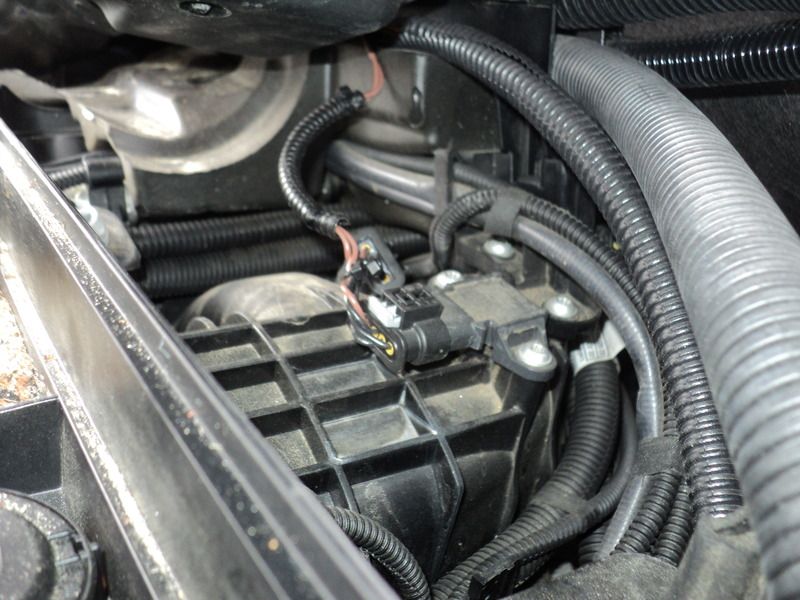 6. The last sensor is going to be the PWG Boost Solenoid. Please note if your car has an EWG (2014+) this will not be present. The plug is on the left side of the engine bay (looking at the car from the front), near the exhaust manifold. Disconnect the factory plug and install it into the female JB4 connector. Plug the male JB4 connector into the PWG Solenoid. 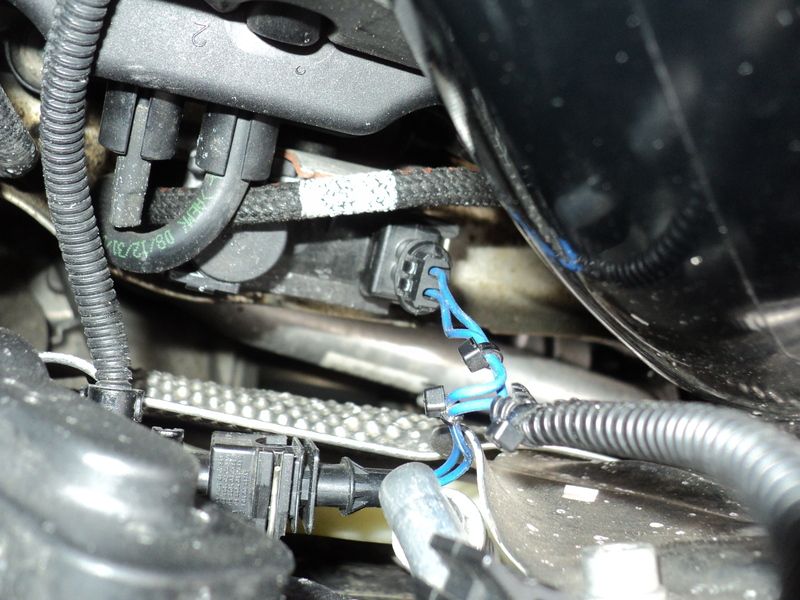 7. Next we are going to install the CAN wires. Newer JB4 units use the OBDII plug in the interior of the vehicle (refer to install guide here). I could have upgraded, but I honestly prefer to use the CAN wires in the engine bay. Anyway, we are going to be connecting to the two wires on the top left of the wiring bundle as shown. You need to pull them out to expose enough to get the POSI-Taps on. The brown wire connects to the yellow CAN wire. The green wire connects to the black/blue wire to the left of it. I realize I did not get a good photo of this (will update later). 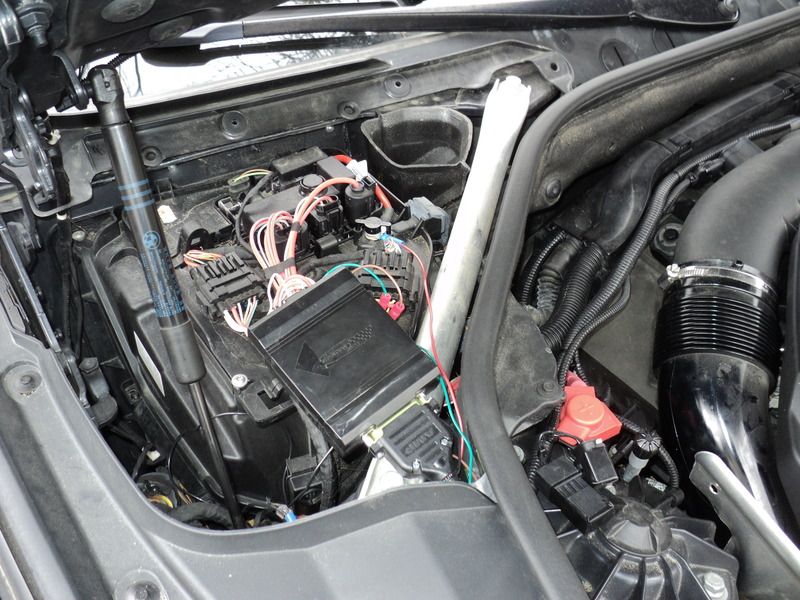 8. Finally, we want to install power and ground to the JB4 unit. The black wire is ground, and the red wire is power. I used two 14-16 gauge insulated wire rings for easy connecting. Just splice the wires and crimp them on. Connect the red power wire to the 10mm nut under the black plastic cap (slides right off). I connected ground to the 5mm Allen nut towards the front of the car. 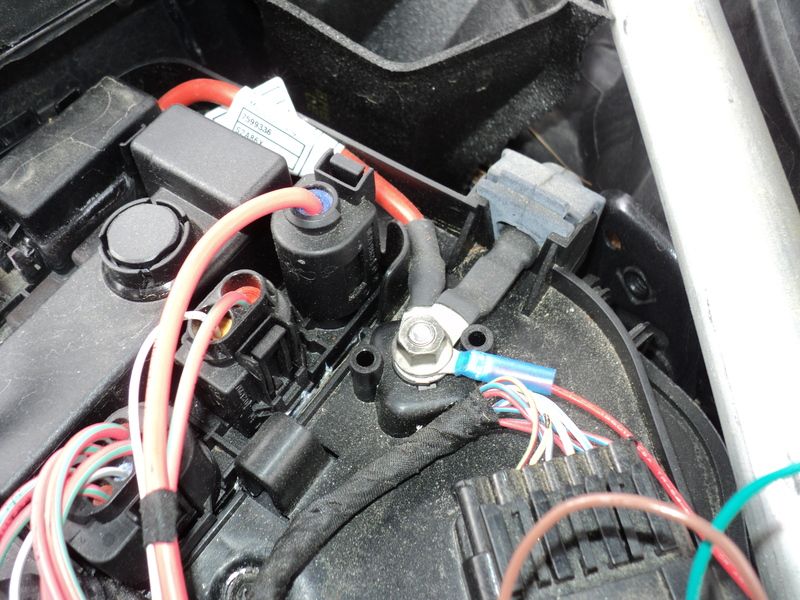 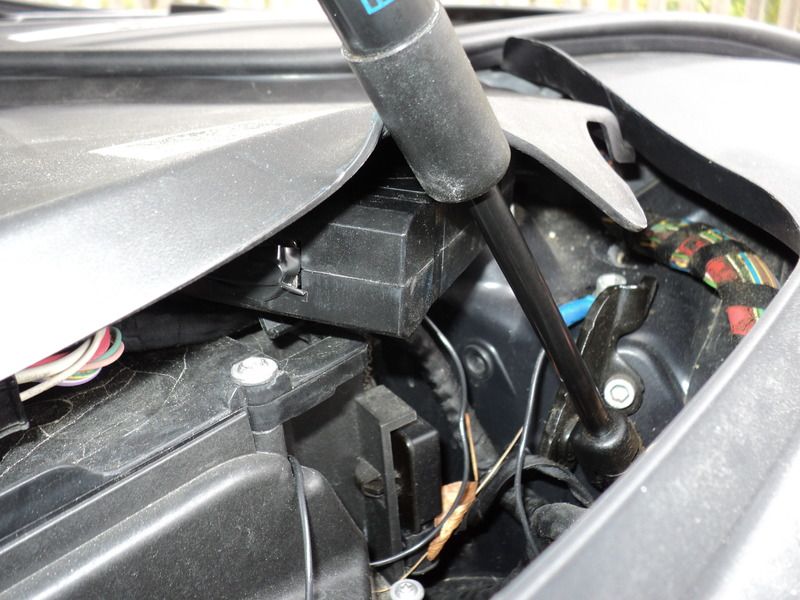 Put the engine cover and cowel back on, and physical installation is complete! For access to the JB4 you can either connect the USB when needed (what I do), install it permanently in the engine bay, route it into the car, or use the JB4 Connect Kit. Refer here for software/firmware/etc to connect to the JB4 with your laptop. |
| 03-26-2016, 01:39 PM | #2 |
|
Dream crusher

984
Rep 2,421
Posts |
Nice work! Stage 1 or 2? Be safe.
__________________
535i MIssion Performance, PS2, Helix HPFP Kit, Wagner FMIC, Spec 3 clutch, Steel SMF, Wolf Racing CP, UUC SSK, GFB dv, SprintBooster, Custom Dynomax Exhaust, M5 Sways, Eibach OE Springs, Koni Sports Adjustable, Custom Short Ram CAI
IG: @bmwdoubles |
|
Appreciate
0
|
| 05-16-2016, 10:20 PM | #5 |
|
IG @bmwF9xG80
3813
Rep 7,593
Posts
Drives: G80 M3, X4M, G07 X7m50
Join Date: Apr 2012
Location: NYC to NJ to Orlando FL
|
I honestly recommend installing the flex fuel wires, everyone says the delivery is smoother and you will also be able to run E85 blend if you ever want to and cars love E85 blend (IAT stays cooler)
__________________
60-130mph 6.5s X4M #HCP
60-130mph 5.0s G80 M3 #OrlandoAutowerks Sauce IG: @bmwF9XG80  |
|
Appreciate
0
|
| 05-23-2016, 12:40 PM | #6 | |
|
First Lieutenant
114
Rep 305
Posts |
Quote:
|
|
|
Appreciate
0
|
| 05-23-2016, 01:07 PM | #7 | |
|
IG @bmwF9xG80
3813
Rep 7,593
Posts
Drives: G80 M3, X4M, G07 X7m50
Join Date: Apr 2012
Location: NYC to NJ to Orlando FL
|
Quote:
 BMS Stage1 is just that not a JB4  If you got the OBD2 version it comes with Flex Fuel wires so its recommended you install it since it will take advantage of your E85 blends otherwise you wont be able to take advantage without it. Run a log on Map4 for now, post it on the n54tech.com forum Then you may proceed with Map1 and do another log/post it and run that for a while until you start understanding certain parameters and if they're ok. http://f30.bimmerpost.com/forums/att...8&d=1433827618 Take it slow, slow and steady, don't use map2 if you don't have access to 93 octane
__________________
60-130mph 6.5s X4M #HCP
60-130mph 5.0s G80 M3 #OrlandoAutowerks Sauce IG: @bmwF9XG80 |
|
|
Appreciate
0
|
| 05-23-2016, 02:11 PM | #8 |
|
First Lieutenant
114
Rep 305
Posts |
Actually, I purchased mines used from a guy locally. Don't know if I got the new updated OBD2 harness because the OBD2 adapter wasn't included during the transaction. But it has the 4 connection; rainbow, black/brown, blacks, and blue, so I'm assuming the all black connection between the black/brown and blue connection is for the flex fuel. I installed mine with 2 positap that connects to the 2 wires in the engine bay. Just got it last week. I do have access to 93 octane so I could run map 2 stock, right? Thanks for the link, will read it, looks very informative.
It's just hard finding good information on n54tech since it's overload with new and outdated information. I don't want to ask too because I don't want to get bashed with people saying do your research and use the search button. I believe us 5 series are more mature and willing to answer and help with questions better. |
|
Appreciate
0
|
| 06-23-2016, 10:30 PM | #9 |
|
Enlisted Member
 5
Rep 41
Posts |
I didn't want to start a new thread since OP covered this topic well, what i do want to add is the Flex fuel cables and how to install them on F10 N55 since no one has very specific info on that. And it took me a while to locate them.
I actualy purchased the unit from OP and installed it yesterday on my car. MasterC17 thank you for a good price, fast shipping and communication after the sale.  So i used this guide to install the JB4. I do want to note that BT should be ashamed for making the product with such cables. Would not kill them to add few extra inches. The install is supper tight and it shouldn't be. Anyway i digress.... to business: If anyone wants to install the Flex fuel wires, they will need to do a little more work. The connector is located at the end of the fuel rail by the fire wall. it is hidden under a slue of wires and a thick foam that sits between intake and the engine. You will have to unscrew 3 screws holding the cradle were the wiring harness resides. At which point you will be able to lift it and locate the connector. I didn't manage to get a pic of the connector per say, but got as close as i could.... I took off the entire intake tube eventually, but now that you know where it is, you may be able to just flex it out of the way.... As you can see, under the wiring harness there is foam, under the foam the fuel rail ends and at the end (cant see clearly) there is a plug were the black JB4 patch goes.... Instead of trying to lift the foam and tearing it like i ended up, you may be able to move the wiring harness and its cradle forward and access the connector from the back by flowing that small wire... P.S. the cable cradle sits on 3 screws, be careful not to drop them in to the engine bay, or the screw bit that sits extremely loose in your screw driver, don't ask why i'm telling you this.......  P.S. if anyone ever again says its about 45 min of work, slap them silly. took me and my cousin 3.5 hours and we didnt even tun USB or OBD2 cable. He works with electronics and high end security equipment and i am DYIer so we are not new to this. I hope with this info, it will be much faster for you guys. I hope this helps anyone even a little, i'll be glad. I always try to share info when i work on my cars. Good luck and be safe while 
__________________
F10 535I xD, 957 GTS, 991.1 C2 MT
F30 328i xD, 2006 Carrera 4, 2007 S550, 2006 CLS500, 2004 S500, 2004 CLK500, 1999 Lexus GS300, 2001 C320, 2002 C230K Coupe 1998 VTR - 1000, 1986 GSX-R 750 |
|
Appreciate
0
|
| 06-23-2016, 10:31 PM | #10 |
|
Enlisted Member
5
Rep 41
Posts |
Sorry guys, dont know why pictures are not showing up, but right click and open in new tab and they will open.
__________________
F10 535I xD, 957 GTS, 991.1 C2 MT
F30 328i xD, 2006 Carrera 4, 2007 S550, 2006 CLS500, 2004 S500, 2004 CLK500, 1999 Lexus GS300, 2001 C320, 2002 C230K Coupe 1998 VTR - 1000, 1986 GSX-R 750 |
|
Appreciate
0
|
| 06-24-2016, 09:17 AM | #12 | |
|
Captain
88
Rep 824
Posts |
Quote:
|
|
|
Appreciate
0
|
| 02-16-2017, 10:44 AM | #13 | |
|
Private First Class
 13
Rep 121
Posts
Drives: 2015 335i xdrive
Join Date: Aug 2015
Location: New York
|
Quote:
__________________
2015 335i xDrive Mineral Grey {JB4} {ER Chargepipe} {ER Competition FMIC} {VRSF Catless Downpipe} {Dinan CF CAI} {Dinan Lowering Springs}
|
|
|
Appreciate
0
|
| 10-18-2018, 02:46 AM | #14 | |
|
New Member
5
Rep 17
Posts |
Quote:
hi guys, can someone tell me exactly where the cables for the obd connection come from? unfortunately there are many yellow and blue / black cables on this plug ... many, many thanks |
|
|
Appreciate
0
|
| 10-18-2018, 11:35 AM | #15 |
|
First Lieutenant
306
Rep 332
Posts |
That is the old instructions. There should now be an OBD cable that run into the drivers side foot well to plug into the OBD port. The positap method for CANBus access is no longer supported.
__________________
2022 G82 M4 - Isle of Man Green w/Kyalami Carbon Bucket Seats - MST Intakes, SSR Downpipes, JB4, AWE Exhaust.
2013 F10 N55 (535i), Pure Stage 2, Fuel-It PI Platinum, Fuel-It Stage 2 LPFP, BootMod3, Custom Turbo Inlet, Custom Cary Jordan Tune, More.. SOLD! 1999 e36 M3 - Estoril Blue - Track Car - S54 Swapped |
|
Appreciate
0
|
| 05-04-2019, 06:54 AM | #17 |
|
Lieutenant General

9153
Rep 14,522
Posts |
So after much research it looks like this is the version I have that doesn't have OBD connection. is the only way to change maps is via labtop? I saw a couple of videos where guys were able to switch maps I think with the volume button as I didn't see them install a OBD connection? Burgertuning said I could upgrade to the newer obd harness but for now I want to use what I have until I get more upgrades done. appreciate for those who can chime in!
__________________
 ~F90Conversion~21"3Piece Forged AvantGardeWheels~KWV1Coilovers~CQUENCE slotted/drilled rotors~GoodridgeStainlesslines~MeisterschaftQuadEx haust~Akrapovic 4"tips~VRSF DP~VRSF CP~TurboSmart BOV~K&N filter~CarbonFiberExteriorComponents~GladenAlphaCo mponents~MatchUp7BMW~Punch P300-12T~ Follow me on Instagram: lsturbointeg |
|
Appreciate
0
|
| 05-04-2019, 06:57 AM | #18 | |
|
Lieutenant General
9153
Rep 14,522
Posts |
Quote:
__________________
~F90Conversion~21"3Piece Forged AvantGardeWheels~KWV1Coilovers~CQUENCE slotted/drilled rotors~GoodridgeStainlesslines~MeisterschaftQuadEx haust~Akrapovic 4"tips~VRSF DP~VRSF CP~TurboSmart BOV~K&N filter~CarbonFiberExteriorComponents~GladenAlphaCo mponents~MatchUp7BMW~Punch P300-12T~ Follow me on Instagram: lsturbointeg |
|
|
Appreciate
0
|
Post Reply |
| Bookmarks |
|
|


