| BMW Garage | BMW Meets | Register | Today's Posts | Search |

|
|
|
 |
2010 2011 BMW 5 Series Forum F10
 F10 Technical Topics
DIY Guides & Discussions
DIY 535i M Performance Exhaust Install F10 Technical Topics
DIY Guides & Discussions
DIY 535i M Performance Exhaust Install
|
 |
Post Reply |
|
|
Thread Tools | Search this Thread |
| 02-09-2013, 12:03 AM | #1 |
|
Private
 27
Rep 85
Posts |
DIY 535i M Performance Exhaust Install
I just installed the M performance exhaust on my 2011 535i the other day, so decided to post some of the phone pics I took as well as write up the steps I used to install the exhaust.
This info is for reference only, follow at your own risk. Tools: Floor jack Jackstands, wheel ramps, etc Wheel chocks Tailpipe cutting tool File or Dremel 17 mm socket Torque wrench 2mm allen wrench Oil, spray lubricant, Wd40, etc Loctite Screw driver Chock the front wheels and raise the entire rear end. There are different ways to accomplish this from using the front side lift point then sliding jack stands under the side rear lift point to the debate of using the differential as a rear/central jack point. You will not need much space to work with, so I opted to use 3 1x8 boards under each rear wheel. Use a reverse logic or modified hockey puck adapter on the floor jack to prevent any damage to the jack up points.  I used the side rear points to lift one wheel at a time and then slid the boards under the tire. 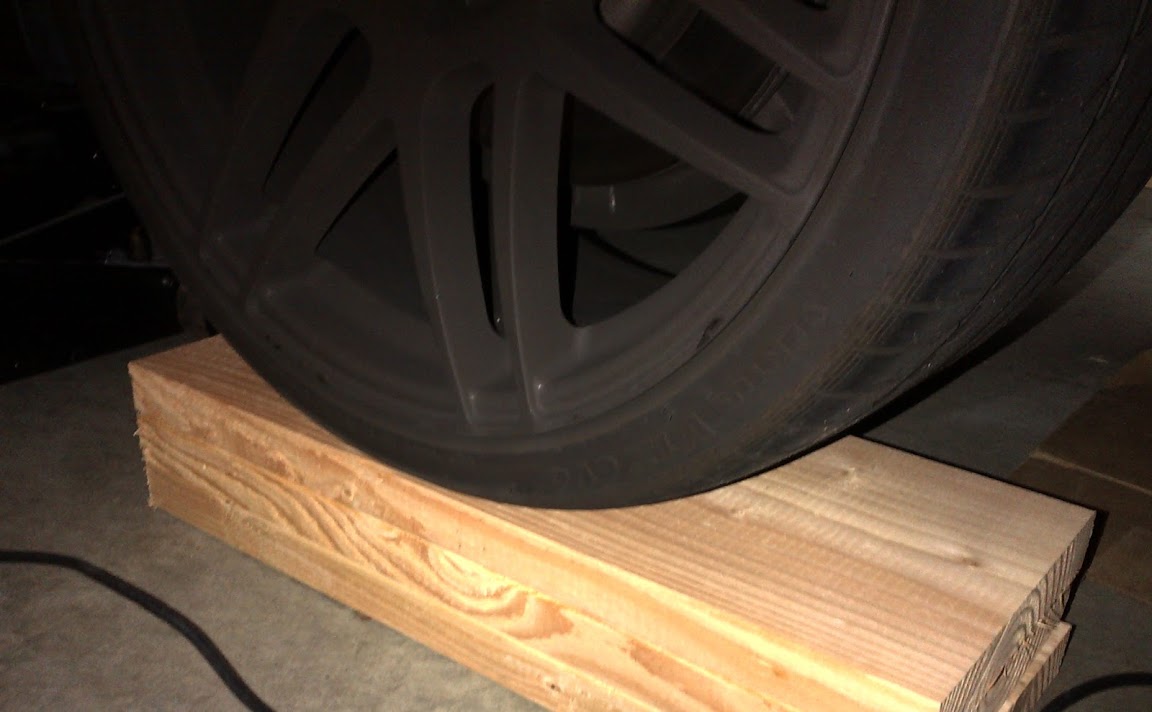 Decide what side you want to work on first. If you look at the car from the rear, I started on the right side. It is time to cut the pipe, to find the factory markings for the cut, look a few inches past the stock muffler for a dimple made at the factory. There will be 2 dimples on each side of the pipe, so I used some painters tape to get a straight cut mark.  To cut the factory piping, I used a chain style tailpipe cutter from my local Autozone. It’s free to borrow and makes a perfect cut around the circumference of the pipe.  If you wanted to use a power tool, a reciprocating saw with a good blade is a good option if you are familiar with controlling it to get a smooth cut. I oiled up the chain cutter with some motor oil, slipped the chain around the pipe and then kept the cutter taught by using the 4th link to hook up to the handle. Apply even pressure with your grip and then pivot the tool 120 degrees from left to right. Don't squeeze too tight, as you can dent the piping. 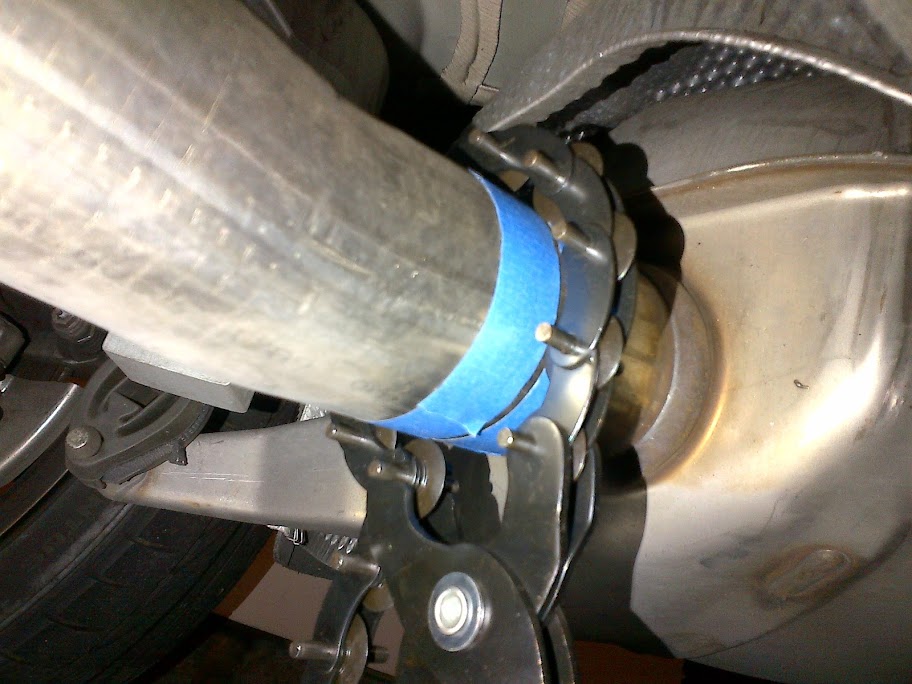 Half way through the cutting process, I had to readjust the cutting tool by moving up 1 link on the chain to continue to keep it taught as it started to make its way through the pipes sidewall. The tool I borrowed was new and very sharp still, so it only took about 5 minutes before the pipe was completely cut.  Now you can drop the exhaust from the hangers. I started with the hanger closest to the rear of the car. I sprayed a few drops of wd40 onto the muffler’s hanger and then used a small thin flat head screwdriver to pry up the rubber around the hangar to allow the oil to seep in. I did this on each end and then was able to easily slide the muffler’s hanger off.  Let the muffler sit on your chest or place something under the tip to protect it’s finish. Follow the same process for the final muffler hanger – spray some oil/lubricant and let it seep into the rubber hole/channel, then slide it off to free up and remove the stock exhaust.  Now that you have a clear view of the cut piping, take a file or Dremel to the cut to ensure it’s smooth and does not have any burs. The tool I used left a very clean and finished cut, so I had to do minimal cleanup.  Now slide on the clamp that came with the kit. I measured and marked the half way point of the clamp and then taped off a visual marking to help me ensure that the clamp was centered on the joint. Now you can slide the clamp towards the front to give you some space as you hang the new exhaust.   I cleaned up the M performance exhaust before mounting it. It had some dust and oil on it when it shipped from the factory, so I took a soft towel/microfiber to it.  I applied more WD40 on the rubber hangers and then hung the rear of the muffler first (tip side) then the piping side.  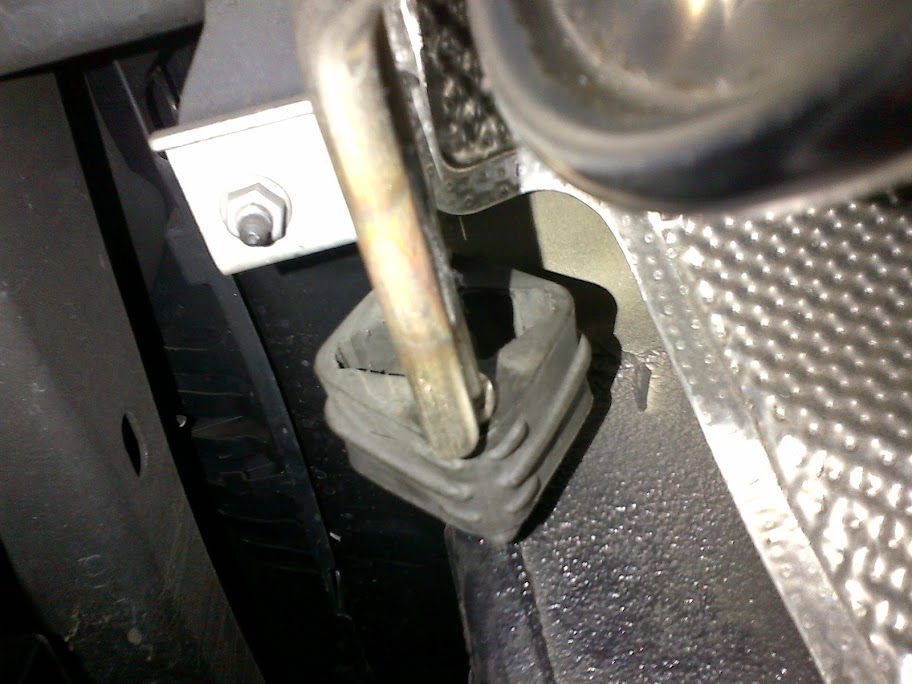 I then slid the clamp over the joint, matching it up to my center point. I decided to rotate the clamp so that the nuts were facing down closest to the sides of the car to allow for better access as I torqued it down as well as to maximize road clearance. Do not tighten the clamp down, you will have to align the exhaust first.  Slide the tip onto the rear of the exhaust to help visually center the tip and exhaust in the bumper cutout.  This is where it helps to have a second pair of hands…. I had someone hold the exhaust tip perfectly centered in the cutout (about a finger gap all around the cutout) while I was under the car tightening down the clamp.  Having the second set of hands to hold the exhaust in place eliminated the need to have to keep loosening and readjusting the exhaust, because as you tighten down on the clamp the exhaust will move… so I highly recommend this process. With the clamp centered on the joint and positioned where I wanted it, I proceeded to tighten the nuts (alternating between each nut) and finished up with a torque wrench to get to 38-45NM. The clamp says 45MN, but various forum threads mention anywhere between 38-45NM should be fine. Now that the exhaust is solidly mounted, you can rotate the tip's position to get the engraved M centered on the top as well as push in or extend out the tip to get the length of exposed tip you prefer. I wanted the tip pushed in and not hanging out past the bumper cutout. One of my tips did have a bit more side to side play than the other, so once again, I had to hold it centered while I tightened down the setscrew with a 2mm allen wrench and some Loctite to prevent it from backing out. With one side down, repeat the above steps on the other side, it should go faster this time. Total time should be anywhere from 2-3 hours depending on how fast you work.  Hope this helps some of you out - Jo Last edited by jdmfrogg; 02-09-2013 at 10:27 AM.. |
| 06-04-2013, 08:39 PM | #4 |
|
First Lieutenant
 56
Rep 324
Posts |
First off, I'd like to say thanks to jdmfrogg. Great DIY. Now for my take on things. I'm fairly savvy with a tool, so this DIY was pretty straight forward and fairly easy. A couple of things I'll add to this DIY:
- The chain tailpipe cutter worked great, and much quicker than jdmfrogg stated. It took about ten to twenty good swipes back and forth to cut through. The result was a nice clean straight cut. - Next, if you're by yourself like I was, try folding a micro fiber towel several times until its as thick as a finger, then tape to exhaust tip. Now you can push up against muffler with one hand and tighten clamp with other. Remove tip, and its perfectly spaced away from diffuser. Sound was great, I love it. Definitely how it should've sounded from factory. Total time was about 1.5 hours.
__________________
13 535i Msport
|
|
Appreciate
0
|
| 09-03-2013, 12:43 PM | #6 | |
|
Major
 76
Rep 1,147
Posts
Drives: 02 E46M3 15 F80 M3 16 X5 35d
Join Date: Mar 2009
Location: San Diego
|
Quote:
How much was the cutting tool? I'm not really savvy with tools, should i just take it a shop and let them do it? Thanks |
|
|
Appreciate
0
|
| 09-07-2013, 08:30 AM | #7 |
|
Private
27
Rep 85
Posts |
Igom - you can borrow the cutting tool for free at your local autozone, just ask for it at the counter
http://www.autozone.com/autozone/sto...questid=667469 |
|
Appreciate
0
|
| 01-07-2014, 01:45 AM | #8 |
|
New Member
0
Rep 11
Posts |
Just wanted to say, excellent DIY write up and thanks. I installed this exhaust with the help of this DIY and everything was spot on. Now if I can only stay off my throttle...lol
 |
|
Appreciate
0
|
| 08-19-2014, 12:16 PM | #9 |
|
Enlisted Member
 1
Rep 32
Posts |
I followed these instructions and it worked for my 2014 535xi m-sport. By the way if you want a set of nice quad tips for your new exhaust check out below links. These look great with the M5 diffuser which I also installed on my 535. (See http://f10.5post.com/forums/showthread.php?t=812737)
I've had these tips on my car for a few months and seem to have pretty good build quality. I really like the rolled tips, it gives it a more OEM look. I went with the 89mm (3.5"), since I felt the stock M5 tips were slightly small (I think stocks are about 3"). These are $89 each so $180 for both which is expensive however there is no welding necessary which makes it worth it. By the way you will have to trim the exhaust exit pipe a few inches to stop the tips from sticking beyond the rear bumper, but you can use the exhaust cutters for that. http://www.quality-tuning.com/audi-a...-l190-200-in60 |
|
Appreciate
0
|
| 05-27-2015, 01:03 PM | #11 |
|
Major

451
Rep 1,161
Posts |
What happened to the valve? The vacuum valve that is.
Did your stock exhaust have the valve on one of the tips? I have a active hybrid and am looking at getting this exhaust but wonder what to do with the valve?
__________________
2014 M5
1990 E30 318i Touring 1999 E38 728i -sold M235i - sold Activehybrid 5 - sold |
|
Appreciate
0
|
| 07-21-2015, 05:29 PM | #13 |
|
Lieutenant Colonel
 
587
Rep 1,907
Posts |
Just did this today. I used ramps and it took about an hour after getting the car up and all the tools together underneath.
My challenges: - not sure I like the sound at all times, part of that is the fact that I have 8AT instead of 6MT - trouble getting the tips centered the way I'd like. Tightening the clamps always seems to force everything into a preset alignment which isn't quite right, even if I'm holding it where I want it - my set is used, and the 2mm set screws on the tips are stuck in place. Despite penetrating oil I can't seem to loosen them and the person originally installing it had the left tip too far out. Still going to work on this one. I would add recommendations: - I used silicone spray - guaranteed not to dry or break down the rubber mounts over time - I put silicone grease on the hangers of the new mufflers before installing. Went together like butter - before making the cut, you may wish to work the tip of the hanger back into the rubber mounts but still leave it mostly mounted. Once the cuts are made there isn't a lot of stability to pry and pull on things. |
|
Appreciate
0
|
| 07-23-2015, 01:13 PM | #14 | |
|
New Member
2
Rep 18
Posts |
Quote:
|
|
|
Appreciate
0
|
| 07-25-2015, 04:57 AM | #15 | |
|
Major
451
Rep 1,161
Posts |
Quote:
__________________
2014 M5
1990 E30 318i Touring 1999 E38 728i -sold M235i - sold Activehybrid 5 - sold |
|
|
Appreciate
0
|
| 07-27-2015, 06:52 AM | #16 | ||
|
Lieutenant Colonel
587
Rep 1,907
Posts |
Quote:
|
||
|
Appreciate
0
|
| 07-27-2015, 07:58 AM | #17 | |||
|
Major
451
Rep 1,161
Posts |
Quote:
Maybe as mine is an active hybrid 5 then?
__________________
2014 M5
1990 E30 318i Touring 1999 E38 728i -sold M235i - sold Activehybrid 5 - sold |
|||
|
Appreciate
0
|
| 07-31-2015, 09:17 AM | #18 | |
|
Lieutenant Colonel
587
Rep 1,907
Posts |
Quote:
I can say that when you've reach speed and get out of the throttle you can't really hear it at all, even with the windows down. Especially if you're 2500 rpm or more. You can hear it a little more if you're below 2000 - you'll almost always be able to tell that SOMETHING is different compared to stock in the lower RPM range. With the windows rolled up it's not all that different even when accelerating, but if I had 6MT it would still be different enough to be appreciated. It seems to be "most different" from stock in the 1750-2500 RPM range. I had a Dinan exhaust on my E39 so I'm used to non-stock exhausts, but I've been driving stock since 2012 when the E39 was totaled. With the windows down I feel like the M PE is pretty pronounced but friends who aren't "car guys" say it's not really all that loud when I'm driving away - enough to be "different" and sound "good" but not enough to attract negative attention or look like a wanna be. Cold starts are quite loud. |
|
|
Appreciate
0
|
| 08-03-2015, 08:21 PM | #19 |
|
Lieutenant Colonel
587
Rep 1,907
Posts |
Also please note, the set screws on my tips appear to be Torx T8 (corrected from T9), not 2mm hex. A 2mm hex wiggles all over the place and 2.5mm hex doesn't engage.
My PE was second hand and they seem to be stuck (with the tips in unequal positions, so I want to sort it out). Not sure if they used super thread lock or if it's corrosion of some sort. Last edited by Surly73; 08-19-2015 at 04:43 PM.. |
|
Appreciate
0
|
| 08-31-2015, 09:59 PM | #20 |
|
Lieutenant

82
Rep 447
Posts
Drives: 2011 750i
Join Date: Jul 2015
Location: Atlanta, GA
|
Great DIY.... I have a 8AT but I still want these mufflers.
__________________
 |
|
Appreciate
0
|
| 11-10-2015, 07:31 PM | #21 |
|
New Member
3
Rep 19
Posts |
How much money?
How much did you buy the mufflers for in USD? Would you recommend the cheapest place I could get these mufflers from?
 The 535i seriously needs this exhaust, stock sounds horrible. Even my C300 4matic sounded much better, it had a more sporty sound. |
|
Appreciate
0
|
| 11-11-2015, 12:21 AM | #22 |
|
Lieutenant General

9188
Rep 14,521
Posts |
Just wanted to say nice write-up!

__________________
 ~F90Conversion~21"3Piece Forged AvantGardeWheels~KWV1Coilovers~CQUENCE slotted/drilled rotors~GoodridgeStainlesslines~MeisterschaftQuadEx haust~Akrapovic 4"tips~VRSF DP~VRSF CP~TurboSmart BOV~K&N filter~CarbonFiberExteriorComponents~GladenAlphaCo mponents~MatchUp7BMW~Punch P300-12T~ Follow me on Instagram: lsturbointeg |
|
Appreciate
0
|
Post Reply |
| Bookmarks |
|
|