

| BMW Garage | BMW Meets | Register | Today's Posts | Search |

|
|
|
| 04-22-2016, 08:37 AM | #1 |
|
Captain
 329
Rep 984
Posts |
DIY - F10 N55 Downpipe
This was actually more difficult than I thought, as it requires the full exhaust to be dropped (unlike E9X) and the top bolt holding the downpipe on is a pain to get to. Otherwise easy.
It took me three hours total having never done a downpipe on an F10 or an N55, and with no reference, so should take 2 or less for anyone following this guide. Photo's were taken after I was done. 1. Remove Center Black Undertray (lots of 8mm bolts). 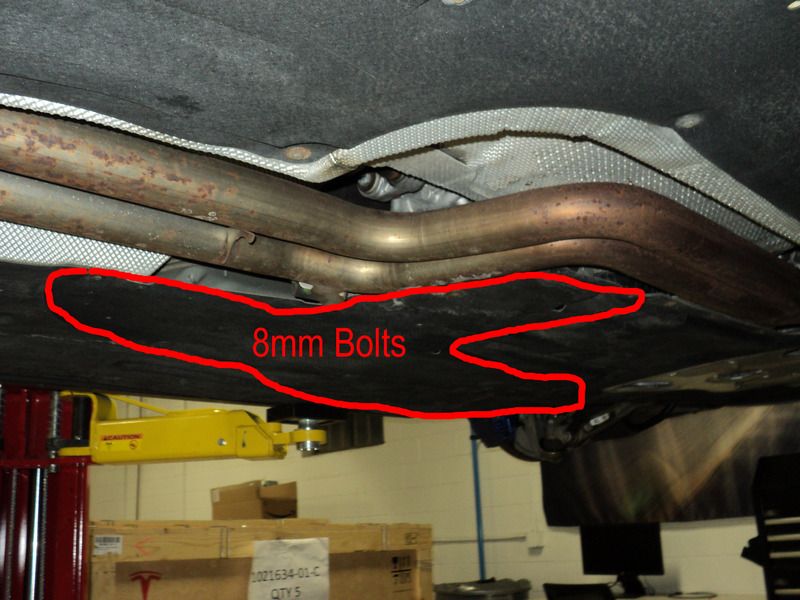 2. Remove Front Black Undertray (lots of 8mm bolts). 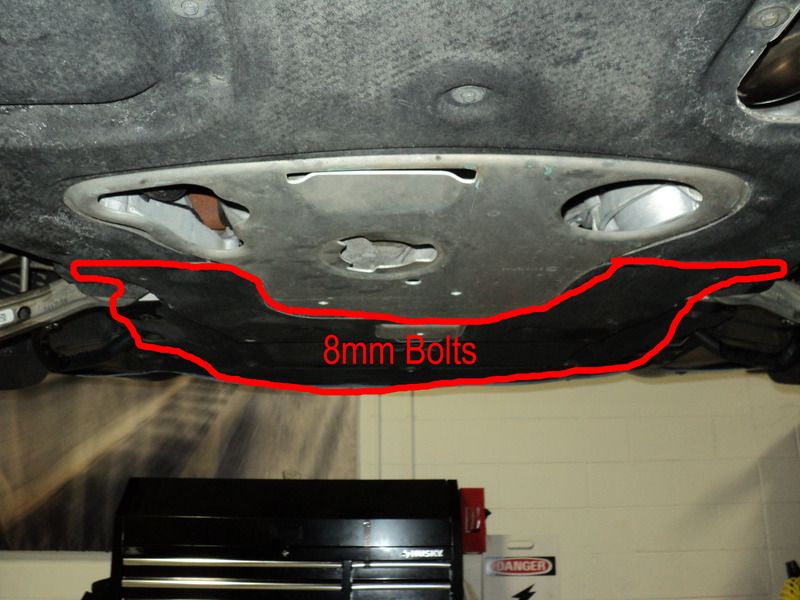 3. Remove Center Metal Undershield (13mm bolts). 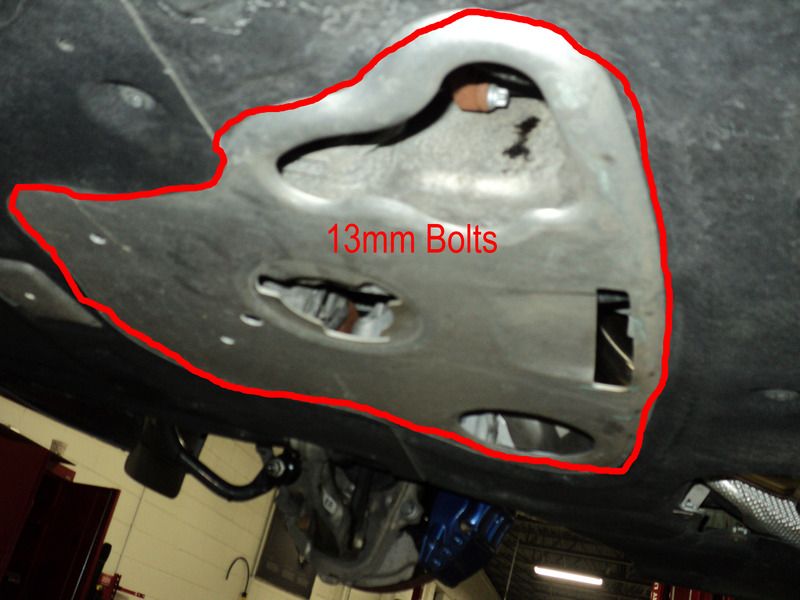 4. Remove Center Exhaust Bracket (13mm bolts). 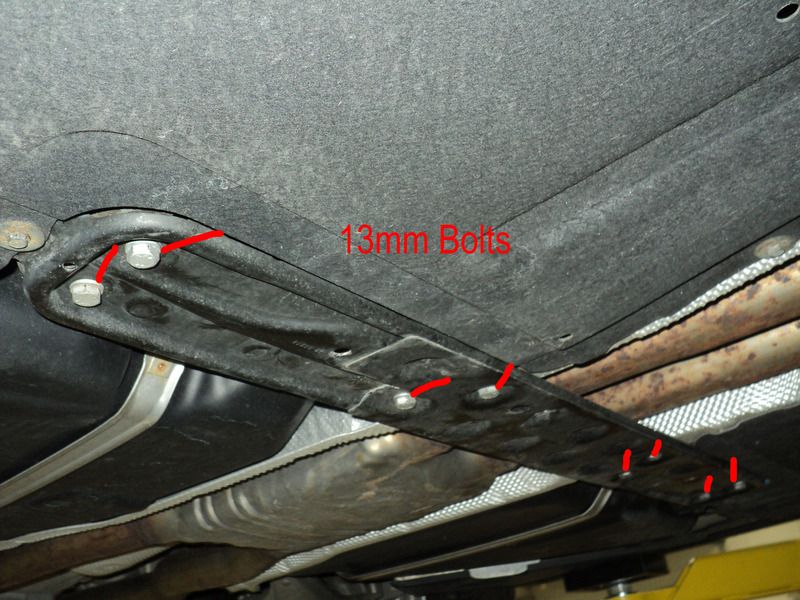 5. Disconnect Downpipe from Exhaust (15mm bolt).  6. Remove exhaust. Will need something to hold it or another person. Six exhaust hangers (two orange, four black). 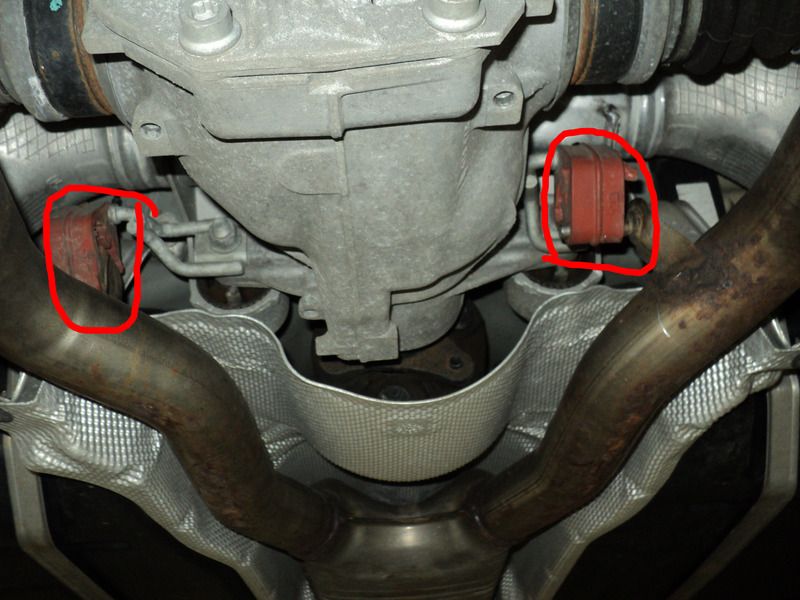 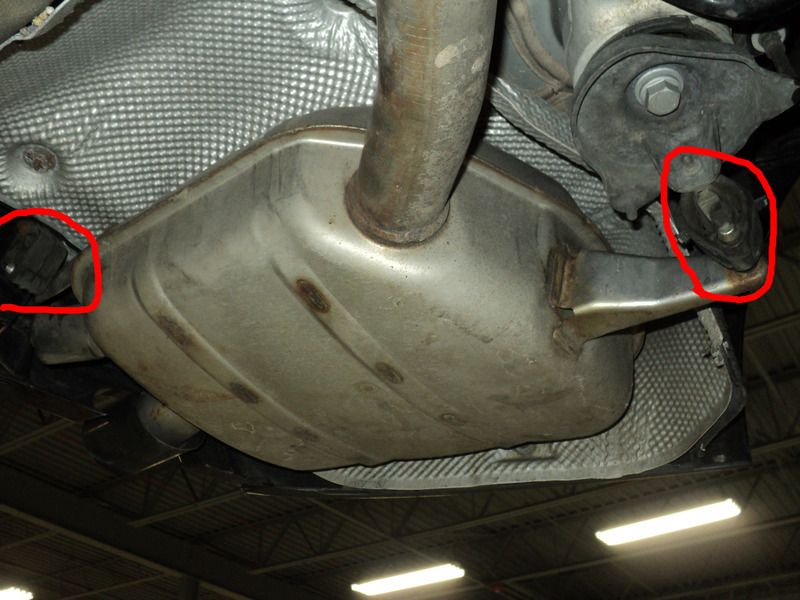 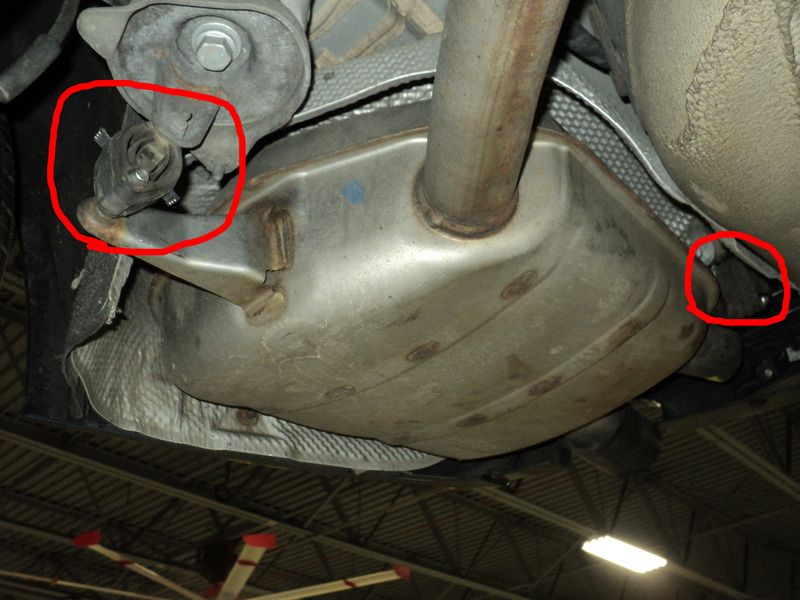 7. Downpipe should be exposed and easily accessible now. 8. Remove 13mm bolt holding bottom of downpipe on (broke on me). 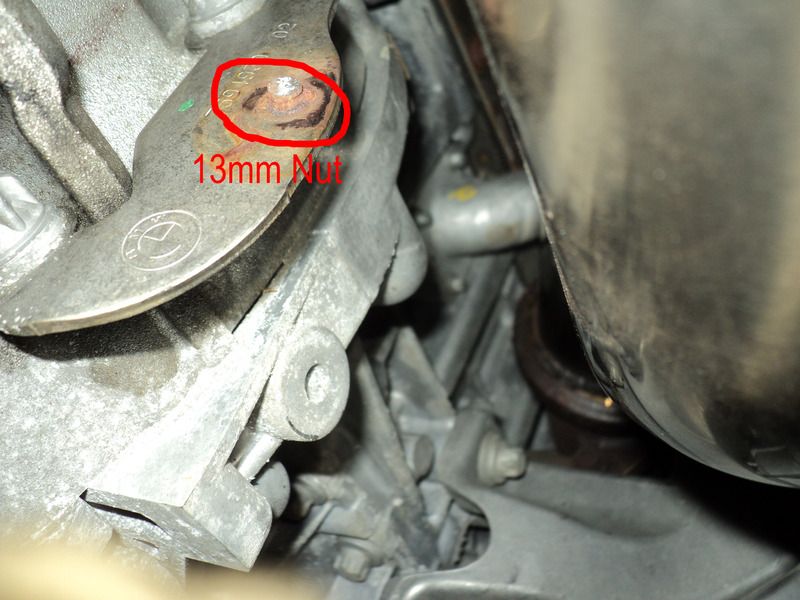 9. Remove 13mm bolt holding top of downpipe on (must use wrench, no access for socket). 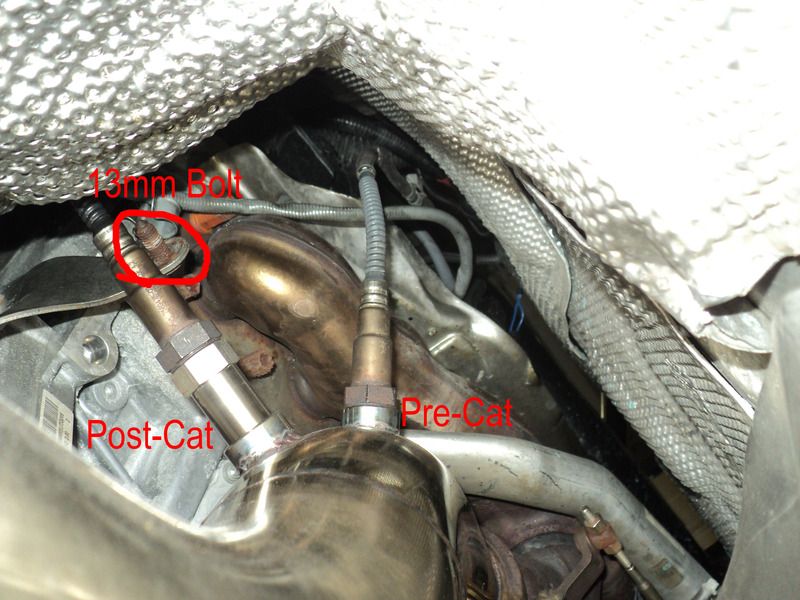 10. Remove 13mm bolt holding downpipe clamp from downpipe to turbo (No photo for now). 11. Access oxygen sensors from engine bay. Pop off engine cover (slide forward and up). 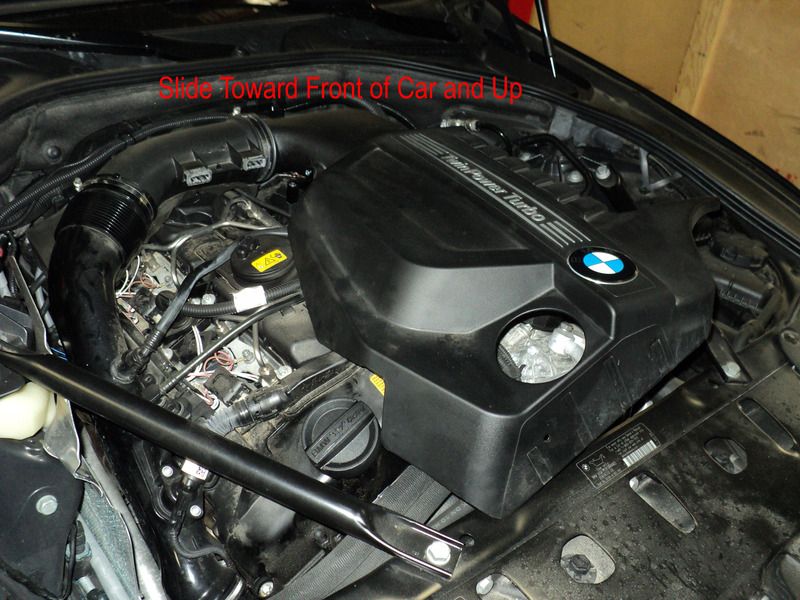 12. Disconnect oxygen sensors, the connectors will be on the left, top of the engine under the intake tube. 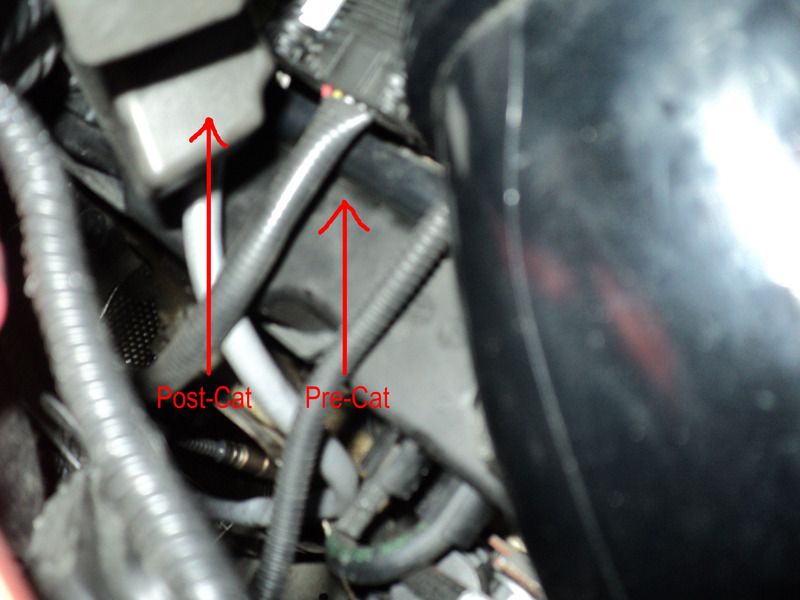 13. Downpipe should now slide right out. 14. Installation is opposite of removal. Oxygen Sensors are 21 or 22mm.
__________________
2009 X5d | 2007 E90 Track | 2002 M3 Track | 1991 535i Track
Last edited by MasterC17; 04-23-2016 at 10:43 AM.. |
| 04-23-2016, 01:45 AM | #3 |
|
Dream crusher

984
Rep 2,421
Posts |
Thanks for the write up I'm pretty sure there isn't one for the F10 N55. Looking forward to the pics.
I took out the entire exhaust too. The second time I didn't have to when using a lift. All of your instructions minus dropping the entire exhaust, pending you have a lift. Unscrew the rear rubber exhaust supports on each side. Have a person with a large crowbar pushing on the exhaust support bracket towards the bumper while the other pulls right at the connection of the DP outlet. Also learned something new when putting in the new DP. - Connect the upper part of the DP and don't tighten all the way, leave a small amount of movement. - Connect the lower piece into the rest of exhaust. Get it lined up and then tighten down the top. This will allow for proper seating and a better sounding DP exhaust note from the proper seating. - Now have one person grab the DP and the connecting exhaust and push them together while someone else tightens it down. By having the DP seated properly on the upper and lower connections you get way less gas smell in the car and the exhaust sounds way better with no leaks.
__________________
535i MIssion Performance, PS2, Helix HPFP Kit, Wagner FMIC, Spec 3 clutch, Steel SMF, Wolf Racing CP, UUC SSK, GFB dv, SprintBooster, Custom Dynomax Exhaust, M5 Sways, Eibach OE Springs, Koni Sports Adjustable, Custom Short Ram CAI
IG: @bmwdoubles |
|
Appreciate
0
|
| 04-23-2016, 10:44 AM | #4 | |
|
Captain
329
Rep 984
Posts |
Quote:
Added photos.
__________________
2009 X5d | 2007 E90 Track | 2002 M3 Track | 1991 535i Track
|
|
|
Appreciate
0
|
| 04-23-2016, 08:12 PM | #5 |
|
Lieutenant General

9156
Rep 14,522
Posts |
Great info here you guys especially if I end up getting a DP!
__________________
 ~F90Conversion~21"3Piece Forged AvantGardeWheels~KWV1Coilovers~CQUENCE slotted/drilled rotors~GoodridgeStainlesslines~MeisterschaftQuadEx haust~Akrapovic 4"tips~VRSF DP~VRSF CP~TurboSmart BOV~K&N filter~CarbonFiberExteriorComponents~GladenAlphaCo mponents~MatchUp7BMW~Punch P300-12T~ Follow me on Instagram: lsturbointeg |
|
Appreciate
0
|
Post Reply |
| Bookmarks |
|
|


