

| BMW Garage | BMW Meets | Register | Today's Posts | Search |

|
|
|
 |
2010 2011 BMW 5 Series Forum F10
 BMW 5-Series (F10) Forums
Regional Forums
UK
Drilling standard acrylic UK number plates BMW 5-Series (F10) Forums
Regional Forums
UK
Drilling standard acrylic UK number plates
|
 |
Post Reply |
|
|
Thread Tools | Search this Thread |
| 11-19-2013, 03:49 AM | #1 |
|
Second Lieutenant
 
463
Rep 249
Posts |
Drilling standard acrylic UK number plates
Sorry ... not a thread about massive alloys or immense HP increase !
According to what I have read on other car forums ... when drilling number plates ... (1) Use an HSS drill bit (2) Ensure the drill is up to a high speed when making contact (3) Drill from the back to front (4) Use masking tape over the front and back drill point (5) Drill into some soft wood on the other side This should help to create a clean drill hole and decrease the likelihood of cracking or fracturing of the acrylic plate. If any one has experience of this, or other pointers ... would be grateful ! Cheers ... |
| 11-19-2013, 03:53 AM | #2 |
|
Colonel
 
602
Rep 2,246
Posts |
That's spot on.
I did some the other week and taped both sides, drilled into a piece of soft wood, drilled from the back to front (so as not to delaminates the sticky backing) and made sure the drill was up to speed. Took all of 30 seconds to drill both, as with most things, it's all in the prep ;-) |
|
Appreciate
0
|
| 11-19-2013, 04:15 AM | #3 |
|
Captain

18
Rep 618
Posts |
My dealer drilled my plates for me. Even after I told him not to. I didn't want my plates drilled. I'm forever swapping plates, but like the clean look of stuck on plates...
__________________
530d M-Sport Touring.
 |
|
Appreciate
0
|
| 11-19-2013, 04:32 AM | #4 |
|
Colonel
602
Rep 2,246
Posts |
Couldn't agree more xs2man
 The plates I drilled were to go back on my 'to be sold' RRSport, so I wasn't worried about a 'clean' look, just needed to get some plates on it  I've got a cherished plate to go on my BMW, and they will be stuck on. I may even go the velcro route this time  to make cleaning the car easier to make cleaning the car easier  |
|
Appreciate
0
|
| 11-19-2013, 05:11 AM | #5 | ||
|
Second Lieutenant
463
Rep 249
Posts |
Quote:
Quote:
Out of interest - with the stick on plates : how do you ensure these don't get stolen by nefarious types? Cheers |
||
|
Appreciate
0
|
| 11-19-2013, 05:25 AM | #6 |
|
Colonel
602
Rep 2,246
Posts |
Any decent sticky pad will put up a fair amount of resistance as long as they are applied to clean surfaces etc. That said, unless you have tamper screws, someone could have those away in under 20 seconds, so I don't really consider the security side of things.
As I mentioned, I'm thinking of going down the 'Super Velcro' route this time as the only problem I find with the sticky pads is that they degrade over time and I'm constantly pulling little black bit of sticky stuff from behind the plate after washing the car. |
|
Appreciate
0
|
| 11-21-2013, 02:53 AM | #7 |
|
Second Lieutenant
26
Rep 267
Posts |
Double-sided tape on a roll - not small pads is the way to go ...
.... and having a new car in August, which the dealer 'drilled' for the issued 13 Plate, appalled by what I found underneath 3 weeks later when my cherished transfer finally came thru ..... mutilated front valance (M-Sport) & umpteen original sticky pads on the rear bumper, with the provided inserts discarded for some reason ....
__________________
M140i LCI-2 is the 16th BMW since 1977 ....
320i *2, 323i, 520i *2, 540i, 535i, 840i, E36 M5, 328i, 530i, 320d, 535d, M135i, M140i * 2 |
|
Appreciate
0
|
| 11-21-2013, 06:57 PM | #8 |
|
Private First Class

5
Rep 159
Posts |
It wasn't this exact one, but in the past I have used this sort of thing to get the screwless look, without having to use sticky pads.
http://www.ebay.co.uk/itm/SECURITY-N...item1c34e46801 |
|
Appreciate
0
|
| 11-22-2013, 05:49 AM | #9 |
|
Colonel
602
Rep 2,246
Posts |
Not a fan of number plate surrounds if I'm honest, even if they added some security.
In all honesty, if some scrote wanted to borrow my plates, I'd rather they left no damage so it'll be strong Velcro or sticky pads for me  |
|
Appreciate
0
|
| 11-22-2013, 12:38 PM | #10 |
|
Captain
36
Rep 619
Posts |
My BM is drilled, although they have done a nice job, but with my cherished plates on the other cars, it is stick on all the way for the clean look personally too.
|
|
Appreciate
0
|
| 11-23-2013, 10:50 AM | #11 |
|
Second Lieutenant
463
Rep 249
Posts |
Followed the initial steps 1 through 5 ... worked perfectly, no cracks or other problems ... and everybody lived happily ever after. The End.
|
|
Appreciate
0
|
| 11-25-2013, 03:04 AM | #13 |
|
Captain
161
Rep 619
Posts |
I'd add 3 things to the list, since I did this to my plates last month when replacing:-
Drill a small pilot hold first, this stops the possibility of rip on the lacquer and plastic getting stuck on the larger bit blades.... And to stop the sudden rush as the large bit goes through use a guide rod (those things that display depth as you drill...) I used the holes from old ones to make correct marker points, just so it was exact... the curvature at the front can add a deceivingly high extra gap between holes!
__________________
Sunset Orange G20 330e xDrive M Sport Pro - Tech/Pro Pack, Park Assist Plus
Bluestone G30 M Sport - Gone to Stud Alpine White F10 M Sport - Gone to Stud Last edited by jedpause; 11-25-2013 at 03:05 AM.. Reason: spelling |
|
Appreciate
0
|
| 11-25-2013, 03:38 PM | #14 |
|
Captain
131
Rep 664
Posts |
1-5 are all good points to follow
 also when drilling hard plastics especially perspex, to prevent stress fractures from forming later around the drill hole. you need to regrind the drill bit to give zero rake and flat the edge, as that is what causes the drill bit to 'bite' into the work piece. 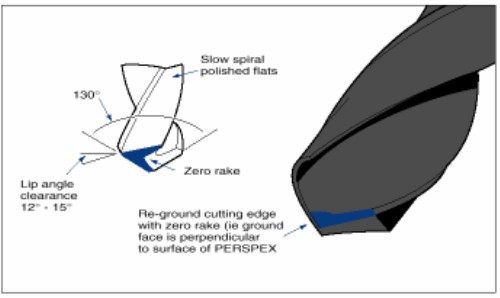  |
|
Appreciate
0
|
| 11-26-2013, 05:31 AM | #15 |
|
Second Lieutenant
463
Rep 249
Posts |
Thanks for the future pointer.
+1 if you can get the film : This looks like the work of [davethefish]. This boy loves [drill bits]. |
|
Appreciate
0
|
| 11-26-2013, 05:37 AM | #16 | |
|
Colonel
602
Rep 2,246
Posts |
Quote:
|
|
|
Appreciate
0
|
Post Reply |
| Bookmarks |
|
|


