| BMW Garage | BMW Meets | Register | Today's Posts | Search |

|
|
|
 |
2010 2011 BMW 5 Series Forum F10
 F10 Technical Topics
DIY Guides & Discussions
F10 Rear Sun Shade Motor Only Replacement DIY F10 Technical Topics
DIY Guides & Discussions
F10 Rear Sun Shade Motor Only Replacement DIY
|
 |
Post Reply |
|
|
Thread Tools |
| 07-13-2020, 10:29 PM | #1 |
|
Colonel
 1713
Rep 2,020
Posts
Drives: 2016 BMW X1
Join Date: Apr 2018
Location: Denver, CO
|
F10 Rear Sun Shade Motor Only Replacement DIY
This will just be a quick write up explaining how I sourced a replaced the sun shade motor for my F10. Eventually the motor will get weak and will not be able to close the sunshade without giving the arms a little assistance. Lubing up the sunshade rails did not rectify the issue. The dealer will just replace the entire sun shade unit for around $800 USD. Now I would like my sun shade to work but not for $800. I took my rear deck apart and removed the old motor from the sun shade. I google the manufacture part number and it looked like same motor was used for BMW, Mercedes, etc. I then found out that BMW sells a replacement sunshade motor for a E31 8 Series that fits out F10 and probably a few more BMW models. The motor even came with new hardware.
PN: 51461388215 Here is also an aftermarket motor for $25: https://www.aliexpress.com/item/4001...45f54c4d7xxe8J 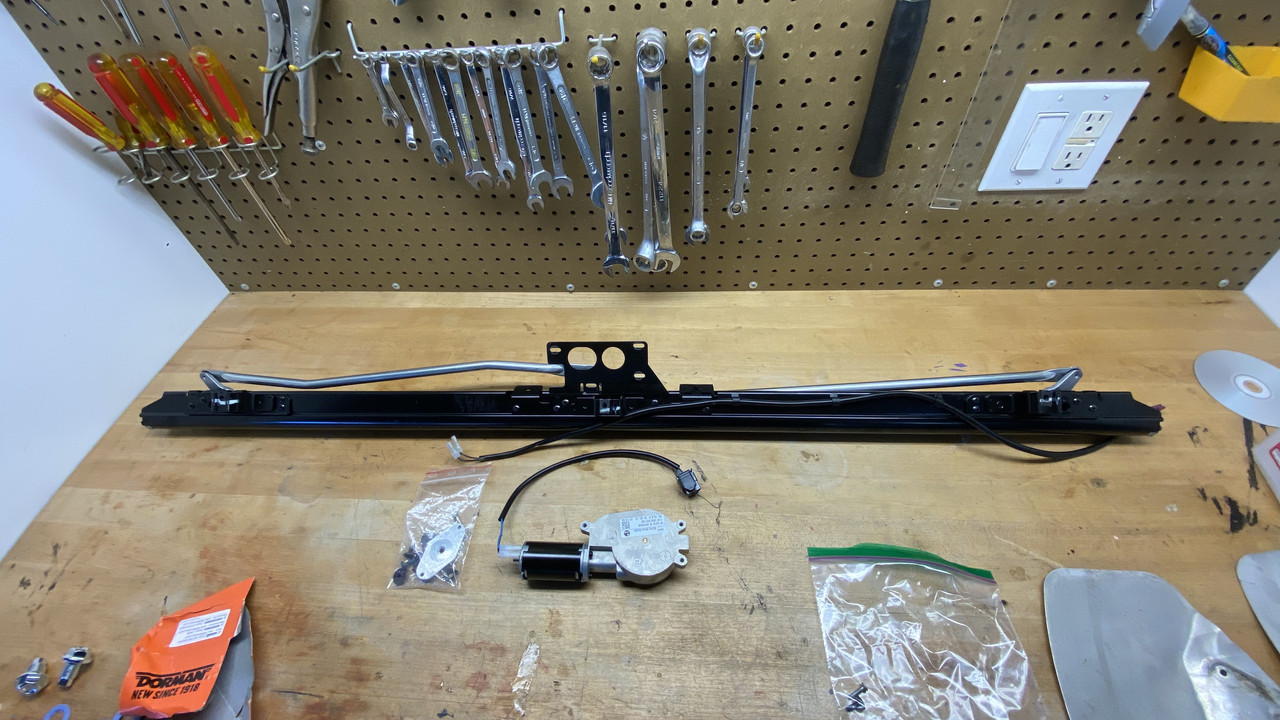 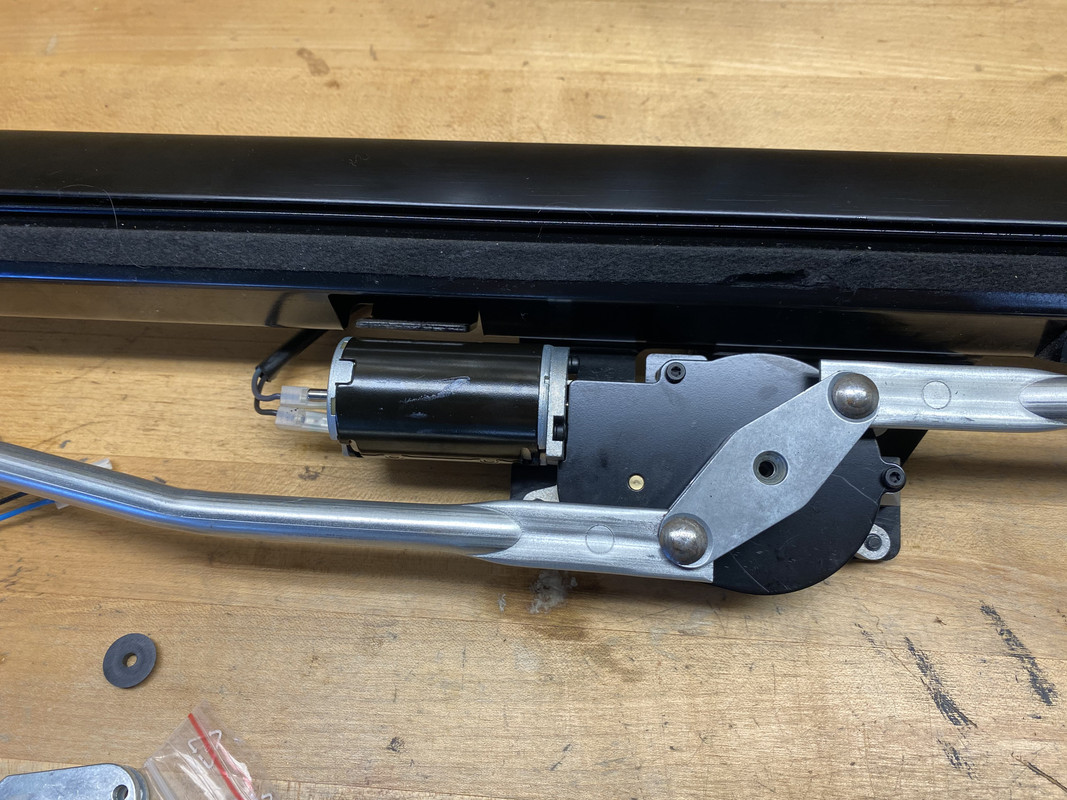 Last edited by Nickco43; 10-29-2020 at 02:34 PM.. |
| 09-21-2020, 09:47 PM | #2 |
|
Captain
 247
Rep 705
Posts |
no freaking way. Great recon work on this!!I've been on the hunt for a used unit but this offers a much better solution! Thank you so much for sharing your findings!

__________________
I'm on the YouTubez now!! Check it out -> https://www.youtube.com/@turbospool
2011 F10 Shuenk N55+ Turbo'd is SOLD. Now building a 2018 Golf R on E85!  |
|
Appreciate
0
|
| 11-27-2020, 08:24 PM | #4 |
|
Registered
0
Rep 3
Posts |
Removing black felt piece
How do you remove the black carpet like piece behind the rear seat? Any videos or step by step guide?
I’m trying to ultimately remove the shade for inspection |
|
Appreciate
0
|
| 04-30-2022, 08:38 PM | #5 |
|
Registered
3
Rep 3
Posts |
Old Thread Revived with new photos/instructions
Fellow F10-enites, I recently acquired my 'new to me' 2013 F10 535i and quickly discovered the rear shade issue. Upon some research, found that the motor is usually in need of replacement. I could not find the Alibaba screamin deal mentioned earlier in this post so I sucked it up and bought a ~$200 unit from ECS tuning. Without a detailed instruction set on exactly how to do this, I used caution and some advice from other posts on other BMW series cars. What follows is my removal/install. ITS VERY EASY. There are, of course, a few tricks to help make this less painful. Of note - my ECS tuning motor replacement did not have the correct wiring (shown later). This was simply resolved by using the connection from my old motor. The only difference in the part numbers were the last two digits. Believe my stock was 059 and ECS was 039. Bottom line - if you have the OEM motor, just save the connections and you should be good. Verified mine works as intended.
Quick overview of steps involved. Details and pictures to follow: CAVEAT: I have rear folding seat so...I my first step was to fold them down (no rear seatback removal for me...). And for some reason, my photos would not post in portrait...only landscape. So some of these are sideways. If there's a fix for that, I'm all ears.  1. Remove rear seat bolsters. Pull from the top to release connection, then lift up to remove 'legs' inserted into the bottom. 2. Remove "Airbag" icon and unscrew torx screw to rear C pillar / air bag covers. 3. Remove 3x 8mm head bolts from trunk that bolt to rear sunshade. Photo 6. (only two bolts shown here. These are the only bolts in this panel, least on my car..) 4. Remove ~6x plastic pop rivets from rear deck near rear seat latch No photo. Simple rivets you remove the center stud then pry out. 5. Pull and remove rear shelf to flip over and lay on rear seat. (unplug speakers and motor connection before getting to the seat.) 6. Remove 3x torx screws holding motor to sunshade bracket and remove torx screw holding sunshade cam to motor sprocket. Caution - I slipped on mine a few times, stripped it, and ended up having to drill it out.... My favorite thing is to drill out bolts so this was just perfect.  7. Put everything back together! BIG TIP - when putting in the rear side bolsters, REMOVE the white plastic clip from the frame of the car. Insert it into the bolster panel you removed. Then when you have to push the bolster back on, it just snaps right in. Trying doing it without that step and you'll probably not ever get it to connect and might bend a few of the plastic pieces trying (ask how I know). Just FYI - Wiring that came with my motor. All in all, I couldn't believe how relatively easy this was. I usually break stuff when I don't have clear instructions and I just took my time and viola...no broken stuff! Hope this helps some of you looking to fix your sunshade! Cheers. |
| 05-01-2022, 10:46 AM | #6 |
|
Captain
247
Rep 705
Posts |
Thank you so much for this! Very detailed. I'll certainly take advantage of it.
__________________
I'm on the YouTubez now!! Check it out -> https://www.youtube.com/@turbospool
2011 F10 Shuenk N55+ Turbo'd is SOLD. Now building a 2018 Golf R on E85! |
|
Appreciate
0
|
| 09-19-2024, 11:06 PM | #10 | |
|
Enlisted Member
 14
Rep 47
Posts |
Quote:
thanks in advance
__________________
2007 BMW E90 335i (undergoing full custom build)
2013 BMW F10 M5 2001 BMW E39 528i 2015 BMW F15 X5 M-Sport 50i |
|
|
Appreciate
0
|
| 01-10-2026, 06:41 PM | #14 | |
|
Private
 37
Rep 83
Posts |
Quote:
Best price I could find on the net was $251 https://www.bmwpartsnow.com/ Last edited by toy4two; 01-10-2026 at 06:53 PM.. |
|
|
Appreciate
0
|
| 01-21-2026, 09:05 PM | #15 |
|
Private
37
Rep 83
Posts |
guys forget replacing the motor. I disassembled mine, the little plastic gear's teeth are all chewed up by the motor worm gear which is metal. Once I remove that gear and hooked the motor to a 12 V source it worked perfectly, it was just binding.
For replacement of the gear you can go 100% plastic (bad original design), plastic gear but with brass section that interacts with the worm gear the problematic area, or 100% metal for all of it. The middle option is likely the best, questest and should last a long time, the all metal will last the longest but maybe noisey depends what you want. Its $10-30 depending on what you choose. They are all over ebay and are listed as for E39 but I measured mine exactly the same mm as stated in the ads. 48 Teeth (48T) 7mm small inner gear and 35-37mm outer gear. Pro tip its a T-20 to remove the motor from the shade bracket so you don't strip like OP, I also spray mine with penetrator soaked for 10mins before starting. Also turns out the non folding seats are even easier to remove than the folding, no side bolsters. Just 4 bolts in the trunk and 2 bolts where rear seat panel was (rear seat just unsnaps on both ends). Hardest part for me was those stupid blue speaker wire connectors to remove the parcel shelf, need a microfiber to protect your finger and a good bit of force to unsnap, no tools needed. My shade was stuck in the upper position so it made it ackward to pull out but not impossible. 1 hour job. BEFORE you open the motor and everything goes flying.... take blue painters tape or mark a witness line on the straight edge of the gear so you know what position it has to be in to go back. There is also a procedure out thereto wind/preload the motor once you replace the gear in place and cover back on, you'll need a 12V battery to activate the motor but a 9V might work too. |
| 01-27-2026, 11:34 PM | #16 |
|
Private
37
Rep 83
Posts |
just finished. I wound up going with the full metal gear available from WalMart, the half plastic with brass arrived but the plastic gear had a defect.
 https://www.walmart.com/ip/Sunshade-...ve/18268551623 I was wrong the full metal one is not noisey. I still put in a good amount of white lithium grease on the gear teeth. Here is a tip to install the new small gear you have to first remove the big metal gear AND the spring. Then you line those up, wear disposable gloves as the grease is a mess. I did the whole job and then the curtain fabric would no full get sucked in, the fabric would flop around. I couldn't figure out what was wrong. Turns out my car had a undisclosed rear windshield replacement from the previous owner. There were glass shards all under the rear parcel shelf. Even after vacuuming all that up, there was still unseen shard in the rear curtain assembly between the fabric and the frame. I had to take it out and shake out all the glass. Put it back in and the fabric no longer was bound up and it works perfectly. -------Ad from Walmart---- Clearance NkeSheng Sunshade Curtain Motor Gear Replace Metal Design Smooth Shading Mechanism For Rear Window Enhancing Privacy Protective (No ratings yet) Key item features Precise engineered rear window sunshade motor gear ensures seamlessly compatibility for installation. Features optimized gear transmission for smooth operations, noise, and enhancing durability against wear/heat. Ideal for car owners seeking DIYer friendly solution to restores sunshade functionality while maintaining cabin privacy and sun protective. Perfect for commuting, road trips, or parked vehicles requiring reliabled sunshade operations and temperature control. Engineered to outperform standard replacements, this gear delivers long lasting performances for your car's sunshade systems while saving repair costs. View all item details |
|
Appreciate
1
778633.50 |
Post Reply |
| Bookmarks |
|
|