| BMW Garage | BMW Meets | Register | Today's Posts | Search |

|
|
|
 |
2010 2011 BMW 5 Series Forum F10
 F10 Technical Topics
DIY Guides & Discussions
Brake pad renewal experience F10 Technical Topics
DIY Guides & Discussions
Brake pad renewal experience
|
 |
Post Reply |
|
|
Thread Tools | Search this Thread |
| 04-15-2013, 12:11 AM | #23 |
|
Colonel
 721
Rep 2,003
Posts |
I changed my fronts yesterday to get rid of an annoying squeak that occured right before coming to a full stop, when humidity is high (>80%) on the first cold 1-2 stops, and when you brake hard like on an incline or suddenly.
I ordered the EUR1504 (for 528i, w/o high speed brakes, ie. NOT for 535i, 550i etc.) from Akebono from Rockauto.com @$80 and $36 shipped to Hong Kong. Arrived in 3 days. The pad is very soft, it flakes easily with a screwdriver - when I took off the OE Textar pads they were hard metal by comparison, it was literally shiny and chimed like a lump of metal when you hit it. I think this was the reason why may brakes squeaked - because the OE semi-metallics were WAY too hard, the pads still had 11mm (on 13k km) compared to the 13mm in the new Akebonos. The hard pad on the hard rotor resulted in jerkiness and it was hard to move the car forward only a few inches because they let go suddenly and grabbed too suddenly. So far on 2 drives the Akebonos have totally exceeded my expectation, i can stop way smoother and zero noise. |
|
Appreciate
0
|
| 05-01-2013, 10:35 AM | #24 |
|
Registered
2
Rep 1
Posts |
Changed rear brake pads on my 2010 F10 520d yesterday. You don't need a computer to do it. See metod below, hope it helps.
F10 BMW 520d 2010 Onwards Rear Brake Pads Replacement Procedure No computer system is required. Make sure front wheels are blocked front and rear. With car jacked up and rear wheel removed, start the engine and release the handbrake button which will release the handbrake at the rear callipers. Turn off the engine. The handbrake will remain off. Off Side Rear Brake Pads Replacement Remove EMF brake actuator electrical cable by unplugging, release cable from bracket and unclip further back to move cable away from the work area. Detached EMF hand brake actuator by unscrewing 2 small torx bolts (star key bolts, not Allen key bolts); one of these bolts will hold the cable bracket, remove actuator from calliper. Rest actuator on suspension wishbone as it still has cables attached. Remove floating central section of calliper that contains the piston, by removing 2 x 13mm bolts that are bolted through to the 2 small rubber gators. Take care not to damage the pad wear sensor on the off side rear wheel. Rest this section on a tall item (wooden block or something similar) to avoid putting undue pressure on the brake hose. Remove brake pads sideways. On off side inner pad carefully release pad wear sensor with screwdriver (it just pops out). Remove metal shims and replace with new or if no new ones available clean up existing shims with wire brush and replace. Attach pad wear sensor to new inside pad and install into place, install outer pad. On central calliper at the rear of the piston where the actuator spline fits, turn spline clockwise with small tool until it comes to a stop (tried turning anticlockwise as advised by someone but ended up pushing piston out even further). Then use a pressure clamp and gently squeeze piston back into calliper body. Slide central calliper into position back over pads. Replace 2 x 13mm bolts and tighten. Offer up EMF hand brake actuator and align spline, when located correctly, actuator will be flush to rear of calliper. Replace cable bracket, replace and tighten 2 x torx bolts (star key bolts). Re-plug actuator cable to actuator. Replace actuator cable and pad wear cables into bracket. Re-clip cable further back. Replace wheel and lower to ground. Near Side Rear Brake Pads Replacement Repeat procedure for near side brake pads replacement. Note that there is no pad wear sensor on this side, therefore when the EMF handbrake actuator is unbolted it can be removed and laid on the ground. Continue to follow the above procedure. Handbrake and footbrake operation When pad replacement is complete and car is on ground, press footbrake pedal a few times. With foot on footbrake, start car and activate handbrake button a few times which will set EMF brake into working order. With handbrake released you will find the brake auto hold also works correctly. Job is complete. Now for a test drive. |
|
Appreciate
1
AlexL4.50 |
| 05-05-2013, 10:21 AM | #27 |
|
Registered
0
Rep 1
Posts |
Thanks Steve G for rear brake pad replacement instructions.
Post by Steve G for replacing rear brake pads was perfect.
 Still cannot reset rear pads warning indicator, however. Tried resetting but receiving "Reset Unsuccessful" message. Any suggestions. |
|
Appreciate
0
|
| 06-16-2013, 11:56 AM | #28 | |
|
First Lieutenant
 363
Rep 365
Posts |
Quote:
If that doesn't work then I would replace one at a time. They are fairly inexpensive. Let us know what you figured out.
__________________
2022 X5 40I - Ours
2016 BMW M2 LBB 6 Sp / ED Pick Up on 07/12/2016 - Her's 1995 Porsche 993 Cab - Mine 2001 Toyota Tundra SR5 Ext Cab - Hay Hauler |
|
|
Appreciate
0
|
| 11-26-2013, 04:13 AM | #31 |
|
New Member
2
Rep 6
Posts |
any update with the service reset unsuccessful message? i done the front pads last night and i'm having the same issue trying to reset the pad indicator... if it was a sensor issue ill try that...
|
|
Appreciate
0
|
| 12-16-2013, 01:11 AM | #32 |
|
Captain
43
Rep 776
Posts |
It took about 5 tries to reset the rear pads. I also tried it with and without the parking brake on and off, which may not matter to you as you're doing the fronts.
I did not have to the front pads. |
|
Appreciate
0
|
| 01-06-2014, 08:16 AM | #33 |
|
Registered
2
Rep 1
Posts |
Rear pads - F10
Hi
Just a comment to Steves very nice description : be carefull when you tighten the two bolts that fix the caliper. Be evare that the caliper can slide from side to side after gathering all the pieces. ( Before you touch the brake and the piston is in back position ). The bolts should not be over tightened - so use gently "experienced hand torque" or torque measuring tool. I overtightened and the caliper could not slide from side to side. Result: hot disc and pads. I was aware and only took a short test ride, so no damage done. Now it is working perfectly. For your information, if you wonder why I do this myself. 1) former mechanics 2) price DIY in Denmark is 48,9. Price at dealer : 338 - so saved in one hour for both sides : 289 ! Regards from here |
|
Appreciate
1
AlexL4.50 |
| 05-07-2014, 12:39 PM | #34 |
|
Private First Class
 19
Rep 101
Posts |
Brilliant info... ive just done my rears took me 1 hour to do!!! I have a question though ive reset the computer rear pads says 22000 miles till need changing is that about right??
thanks again to the OP. |
|
Appreciate
0
|
| 05-08-2014, 03:56 AM | #35 |
|
Registered
3
Rep 2
Posts |
Brake pad replacement on 2011 528i F10
The fronts are super easy, especially if you are not resurfacing the rotors. I just changed out both my front and my back brake pads to ceramic. I was reading some other posts about needing to hook up the car to the BMW computer to reset the rear brakes because they are electronic or something. Totally Hogwash. All you have to do is remove the two torx screws on the caliper and slide out the caliper assembly holding the pads. The pads just literally pop out right after. Then there is a black rounded piece attached to the calipers that you need to unscrew...again two more torx screws. Once you remove this black cover, it has a female "gear" on the inside of cover. Use this as a wrench to rotate the male gear on the inside CLOCKWISE until it stops. Another poster said rotate counter clockwise....Do Not Do it! The caliper piston will be pushed totally out. Once you rotate clockwise until it stops, then you can use a conventional tool to compress piston inward to fit in the pads. I always use a large C clamp. After that, install pads and reassemble everything back. Then just start the car and pump the brakes to build up pressure and test the parking brake a few times. Easy Peasy!
|
|
Appreciate
2
AlexL4.50 windowmaker75.00 |
| 05-08-2014, 04:00 AM | #36 |
|
Registered
3
Rep 2
Posts |
Brake pad replacement on 2011 528i F10
The
 fronts are super easy, especially if you are not resurfacing the rotors. I just changed out both my front and my back brake pads to ceramic. I was reading some other posts about needing to hook up the car to the BMW computer to reset the rear brakes because they are electronic or something. Totally Hogwash. All you have to do is remove the two torx screws on the caliper and slide out the caliper assembly holding the pads. The pads just literally pop out right after. Then there is a black rounded piece attached to the calipers that you need to unscrew...again two more torx screws. Once you remove this black cover, it has a female "gear" on the inside of cover. Use this as a wrench to rotate the male gear on the inside CLOCKWISE until it stops. Another poster said rotate counter clockwise....Do Not Do it! The caliper piston will be pushed totally out. Once you rotate clockwise until it stops, then you can use a conventional tool to compress piston inward to fit in the pads. I always use a large C clamp. After that, install pads and reassemble everything back. Then just start the car and pump the brakes to build up pressure and test the parking brake a few times. Easy Peasy! fronts are super easy, especially if you are not resurfacing the rotors. I just changed out both my front and my back brake pads to ceramic. I was reading some other posts about needing to hook up the car to the BMW computer to reset the rear brakes because they are electronic or something. Totally Hogwash. All you have to do is remove the two torx screws on the caliper and slide out the caliper assembly holding the pads. The pads just literally pop out right after. Then there is a black rounded piece attached to the calipers that you need to unscrew...again two more torx screws. Once you remove this black cover, it has a female "gear" on the inside of cover. Use this as a wrench to rotate the male gear on the inside CLOCKWISE until it stops. Another poster said rotate counter clockwise....Do Not Do it! The caliper piston will be pushed totally out. Once you rotate clockwise until it stops, then you can use a conventional tool to compress piston inward to fit in the pads. I always use a large C clamp. After that, install pads and reassemble everything back. Then just start the car and pump the brakes to build up pressure and test the parking brake a few times. Easy Peasy! |
|
Appreciate
0
|
| 07-13-2014, 01:41 PM | #37 |
|
First Lieutenant

19
Rep 329
Posts
Drives: BMW 520D Touring 2012
Join Date: Nov 2010
Location: Sweden
|
I had mine replaced by a none BMW shop, but the car still complains about need to change brake pads. Is it necessary to have this service warning done at a proper bmw shop?
__________________
  |
|
Appreciate
0
|
| 07-16-2014, 02:15 AM | #39 |
|
First Lieutenant
19
Rep 329
Posts
Drives: BMW 520D Touring 2012
Join Date: Nov 2010
Location: Sweden
|
Im in the menu now but I cant find out how to remove the service req message.
|
|
Appreciate
0
|
| 10-02-2014, 12:10 PM | #40 |
|
Registered
0
Rep 1
Posts |
I did front and rear pad replacement on my F10. Front pads are very straight forward, and the rear pads are pretty easy also, if you follow the directions about removing the actuator cover, and turning the spline CLOCKWISE.
One mishap I had was that I engaged the EMF parking brake after I removed the caliper...foolishly, I thought that if I engaged and then disengaged, the piston would pull back. Well, that doesn't happen. What does occur is that when the EMF brake is engaged (when the caliper is off the rotor), the piston will extend to full extension. You can still turn the spline to back it off to install the pads, but it is a hassle. When i finished, I couldn't reset the EMF brake, and got a Parking Brake fault message...my indy was able to reset via the computer, so that saved me. I assume the fact that I let the piston extend had something to do with the fault message, and why the EMF wouldn't reset. |
|
Appreciate
0
|
| 11-22-2014, 03:43 PM | #41 | |
|
New Member
5
Rep 19
Posts |
Quote:
I'd add a couple of refinements to your operation:-
The offside (1st one and with sensor) took around 1h15 from jacking up to finish, but I was being cautious - as you should first time! The nearside around 30 minutes all in (easier as no sensor + knowing what I was doing) The wear on all 4 pads was wildly different - Offside outer - 4mm and a visual inspection made me swear at the pessimistic warning. The offside inner (with the wear sensor) was about 3.5mm, so I was equally annoyed. However, the nearside outer was 3mm and inner 0.5mm - all but gone and only 170 miles past the "service now" warning. I can only assume that this is due to TC operation on the nearside pulling from left hand junctions perhaps? Whatever, I assume that in Germany the right side wears first, hence I assume why they place the only sensor there. So it kind of works for the UK, but do NOT rely on a visual indication from the outer pads as the inner pads wear first, the nearside especially in my case (others have indicated the same). So if you drive on the right, perhaps it comes up too early - if the sensor side had been the lowest wear, it was only 80% worn. (11.5mm starting) I assume that in the (BMW) workshop they have a command to wind back the EMF electrically and don't need to remove the EMF actuator. Unless someone knows of a canny way to wind it off electronically - that would make the job even easier as this is the most fiddly bit. Mine lasted 39,150 miles to the "service now" indication, having started life with 30,000 miles default life expectation, which counts down 1:1 mile by mile until 4000 (I think) and then waits for the wear sensor to be contacted and then goes down according to actual wear. Oddly, on reset it's starting point is 43,000 miles - but either way the sensor will come into play when it needs to. The reset menu is found by (I think) pressing the BC button on the indicator stalk, holding in the trip reset button in the instrument pod until you see a service picture, scrolling through by tapping the reset button until you reach "brake pads" and then hold for seconds until it asks if you want to reset, tap reset for yes and then hold for seconds until "resetting" shows. And it's done. Last edited by StealthBomber; 11-22-2014 at 03:57 PM.. |
|
|
Appreciate
1
AlexL4.50 |
| 05-17-2015, 08:10 PM | #42 |
|
BMW Addict

104
Rep 792
Posts |
So I changed out my pads and rotors this weekend, and thought I'd add some pictures I snapped during the process. The info in this thread is helpful and informative, but I'm suspecting there are others out there that may be wondering what the EMF actuator looks like, and could benefit from a look at the components before they start the pad/rotor replacement process. I didn't take pictures of the entire process, just the parking brake / EMF actuator removal and reset portion of the procedure on the rear axle.
I happened to stumble across this PDF that explains the EMF actuator operation and function. Kinda cool info with some detailed graphics. This is a pic of the EMF actuator shown as attached to the back of the caliper body. The wiring harness that connects to the top of the EMF actuator should be removed for easier manipulation of the actuator once it's removed from the caliper body. Remove this by pressing down on the latch and pulling away from the actuator. 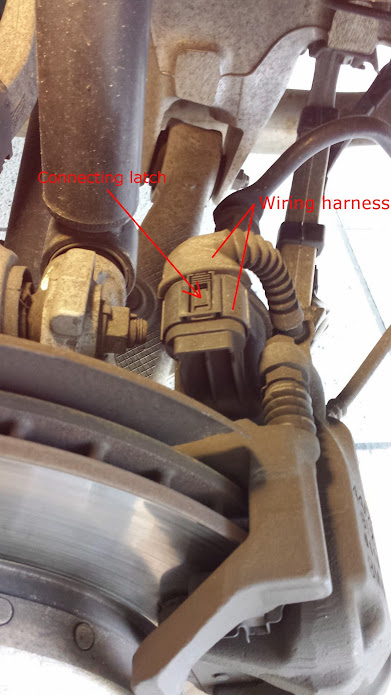 This is a photo of the EMF actuator and caliper body assembly after having been unbolted. The actuator can be separated from the caliper by removing the two torx screws as noted in the pic. 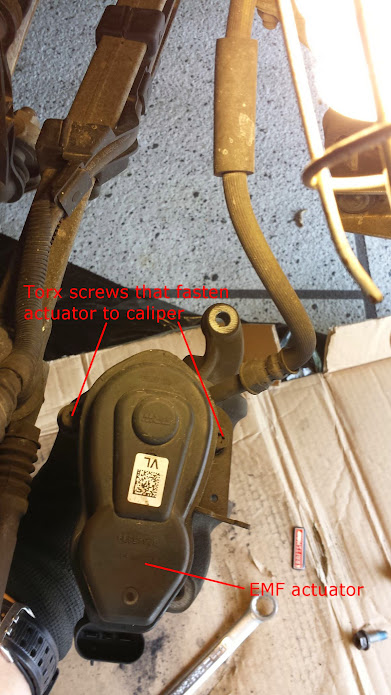 The EMF actuator after having been separated from the caliper body. Set this aside as you continue with the rest of the procedure.  This picture shows the spline hole at the back of the caliper body once the EMF actuator has been separated from the caliper.  Insert a 7mm allen wrench into the spline hole and rotate clockwise until the limit is reached and the actuator is reset. Once complete, the caliper piston can be compressed. 
__________________
'11 Black Sapphire F10 550i l ZSP l Avant Garde 20" M310
|
|
Appreciate
1
AlexL4.50 |
| 05-24-2015, 08:17 AM | #43 | |
|
Private First Class
33
Rep 177
Posts |
Quote:
|
|
|
Appreciate
0
|
| 05-24-2015, 09:54 AM | #44 | |
|
BMW Addict
104
Rep 792
Posts |
Quote:

__________________
'11 Black Sapphire F10 550i l ZSP l Avant Garde 20" M310
|
|
|
Appreciate
0
|
Post Reply |
| Bookmarks |
|
|