

| BMW Garage | BMW Meets | Register | Search | Today's Posts | Mark Forums Read |

|
|
|
| 10-09-2016, 02:11 PM | #1 |
|
Major
 
801
Rep 1,214
Posts |
5A1 LED Fog Lamp Retrofit.
My car originated from the factory as a "no-line" car and lacked any fog lamps what so ever. This has been a long put off retrofit as frankly it wasn't that important to me, and because it was too damn hot outside. For the last 4 months or so I've had fancy pants LED foglamps in my MSport bumper that were non-op.
This morning the weather was mid 60's so I decided to go ahead and complete it. First off this isn't really for anyone going from halogen to LED fogs, this is for those of us devoid of fog lamps at all.  My solution was pretty straight forward. I removed donor wiring from a wrecked F10 at a salvage yard and set everything aside. Since these 2 wires were separated from the main harness I wrapped them with techflex and sealed each end with adhesive heat shrink for a nice finished look. All of the major body wiring on the drivers side passes through the firewall in a large bundle with an injection molded polyurethane foam grommet. Usually BMW specifies a rubber grommet that can easily have wiring added/passed through it. The molded polyurethane grommet in very dense and resistant to puncture. When looking from the inside there is a divot that looked like a swell place to punch a hole through. I used a sharp straight instrument to punch a pilot hole through the foam polyurethane, and wiggled side to side to feel for metal or wiring. Once satisfied I used a 1/4" drill bit to make a clean opening through the dense foam.  Once you pull the wiring carefully through the hole you've made you need to connect each lead to the FRM (footwell module) that controls the fog lamps. A58*3B and A58*2B connectors are physically near identical so make sure you populate the correct colored wire into the correct socket. There are multiple empty sockets so if you don't pay attention there is a possibility for problems there.  Replace the drivers underdash paneling, knee airbag and then move out to the engine bay. Here you'll run the wiring down the drivers side inner structure along the path of the hood release cable, in front of the coolant expansion tank, and down to the X149*1B connector for the front bumper harness. Remove the silicone plugs and click the female fog lamp wiring into place. Which socket you use isn't important there are only 2. Just make sure the wiring colors match on either side of the X149*1B..  Here is the X149*1B connector on the bumper harness side, that I previously added the wiring to when I had the front bumper off 4 months ago. Again it doesn't matter which one of the two wires goes in which socket so long as the color is the same as it passes through the connector block.  With all of that buttoned up I swapped out the headlamp switch with the fog lamp equipped one, which is done by pulling the wood trim panel free my hand and 4 T20 screws holding the switch to the trim. Connectors are the same and require no modification. All that is left is to code 5A1 to the VO. I am for the moment holding off on that because I thought out of curiosity I would test the fog lamps first. They power right on with the button press and I don't get any iDrive or Kombi messages complaining about the fog lamps. Will report back on that and code as needed. |
| 10-10-2016, 01:15 PM | #2 |
|
Major
801
Rep 1,214
Posts |
Did a test run last night to verify operation after night fall and found about 5 minutes or so after turning on the LED lamps started to flicker. Looked like VO coding for the LED lamps is definitely required. Interesting how the FRM works to power the fog lamps even though the car doesn't have any fog lamps by the VO.
|
|
Appreciate
0
|
| 11-24-2016, 11:33 AM | #6 |
|
Major
801
Rep 1,214
Posts |
Sure, the OE BMW P/N for the foglamp connector repair kit is: 61132360041
It includes the connector hosing, crimpable terminals, and silicone seals. 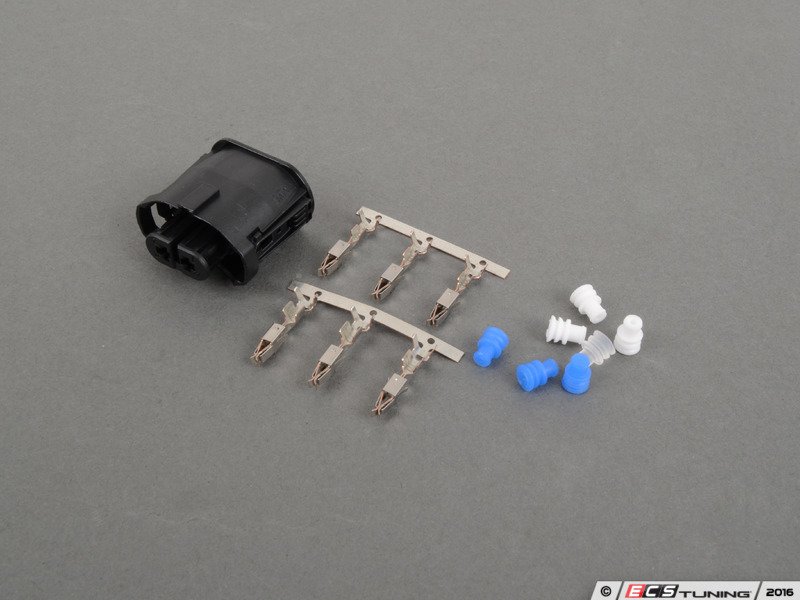 The MALE pins that go into the X149 connector are most likely 61138364567 The FEMALE pins that go into the X149 connector are most likely 12521433217 If you are making your own harness you can bypass the X149 connector entirely if you want. Its just a union under the drivers headlamp so the bumper can be removed more easily without unplugging the PDC sensors etc. The pins that go to the FRM are not the same size but are of similar construction. I think the correct BMW PN for those is 61138364834 |
|
Appreciate
0
|
| 05-24-2017, 04:17 PM | #7 |
|
First Lieutenant
 108
Rep 364
Posts |
Finally after some 6months I have all the bits minus the loom ready and waiting!
How did you route the loom from x149 to the frm? Did u clip it anywhere?? Looking forward to tackling this soon |
|
Appreciate
0
|
| 11-18-2018, 11:56 AM | #11 | |
|
First Lieutenant
108
Rep 364
Posts |
Quote:
|
|
|
Appreciate
0
|
| 03-04-2019, 06:53 AM | #12 |
|
Registered

0
Rep 4
Posts |
Earth for the lights themselves?
Hi,
I am just about to retrofit my 2013 SE with the standard SE LED fog lights (I dont have the MSport bumper). This post is a great help, the only piece of information I am missing is where the earth connection is made for the lights? The diagram above shows the X143 connector for the other side of the bulb, where is this located? Is it local to the light itself? Thanks Rob Last edited by Rigadon; 03-04-2019 at 12:09 PM.. |
|
Appreciate
0
|
| 03-06-2019, 09:27 AM | #13 |
|
First Lieutenant
108
Rep 364
Posts |
Hi Rob
I did this on my se not long ago What I did was. Brought the two cables from passenger side to the driver side of bumper, combined the ground wires and put a 3pin male/female plug there to allow me to remove easily should the bumper ever need to come off Then all 3 wires have gone into the cabin with the two signal wires going to the module and I used the ground point right next to the module. Gold luck! |
|
Appreciate
1
Rigadon0.00 |
| 03-06-2019, 10:32 AM | #14 | |
|
Registered
0
Rep 4
Posts |
Quote:
Thanks for the help! |
|
|
Appreciate
0
|
| 03-06-2019, 02:03 PM | #15 | |
|
First Lieutenant
108
Rep 364
Posts |
Quote:
Just be mindful when your routing it through the middle grill area to tuck it into the bumper well and leave a little slack. Put the connector plug behind the drivers side grille, rest of the cabling will go up behind the headlight, along the chassis leg, tucked away, I clipped it to the boot release cable then under the scuttle panel. I found it incredibly difficult to puncture the big grommet instead opting for a hole in the grommet which the bonnet release goes through, a good gob of black silicone windscreen sealant was sufficient and I've monitored for leaks - none over last 6months or so Do update how you get on |
|
|
Appreciate
0
|
| 03-08-2019, 12:21 PM | #16 | ||
|
Registered
0
Rep 4
Posts |
Quote:
I have removed the covers inside the car, exposed the FRM and figured out how the two connectors are released. Just need to tackle piercing one of the grommets tomorrow as rain has stopped play today. |
||
|
Appreciate
0
|
| 03-09-2019, 01:58 AM | #17 | |
|
First Lieutenant
108
Rep 364
Posts |
Quote:
Only afterwards did I realise that would have been the perfect time to retrofit a front camera! |
|
|
Appreciate
1
Rigadon0.00 |
| 03-09-2019, 02:03 PM | #18 | ||
|
Registered
0
Rep 4
Posts |
Quote:
All buttoned up and working now.  I haven't coded anything, but I don't seem to be having any flashing issues. |
||
|
Appreciate
0
|
| 03-08-2021, 12:00 AM | #19 |
|
Private
 25
Rep 75
Posts |
just want to give a shout out to stück, using your guide/diy today I managed to retro fit fogs into my F10 D that didn't come with msport or fogs. I actually made brackets and mounted hella sealed beam projectors and used a morimoto his harness and 6k lumen led bulbs. zero errors or coding needed and wiring went decently well thanks to your diagram. thank you sir
|
|
Appreciate
0
|
| 01-22-2022, 10:27 AM | #21 |
|
Registered
0
Rep 1
Posts |
many thanks
I wanted to express my gratitude by thanking @Stück for the great detailed info and the others for their contribution. Successfully installed and coded led fog lights on a F11 LCI.
Does anyone know how the fog lights can be coded into cornering lights? My headlights are basic Xenon LCI headlights and have no cornering lights. |
|
Appreciate
0
|
Post Reply |
| Bookmarks |
| Thread Tools | Search this Thread |
|
|


