2010 2011 BMW 5 Series Forum F10
BMW Garage BMW Meets Register Today's Posts
 

2010 2011 BMW 5 Series Forum F10 F10 Technical Topics Wheels / Tires / Suspension / Brakes Base Brakes: Anti Rattle Clip Install Tips???
Post Reply
 
Thread Tools Search this Thread
      01-25-2019, 11:48 AM   #1
John H.
Lieutenant
John H.'s Avatar
United_States
230
Rep
455
Posts

Drives: 2014 535i XDrive
Join Date: Jun 2017
Location: The O.C.

iTrader: (5)

Base Brakes: Anti Rattle Clip Install Tips???

My goodness! Trying to get this clip back on was brutal! Any tips would be appreciated!

Appreciate 0
      01-25-2019, 03:25 PM   #2
.BMW.
Major General
.BMW.'s Avatar
Sweden
1863
Rep
5,140
Posts

Drives: BMW F11/F31
Join Date: Jun 2013
Location: Sweden

iTrader: (0)

A third hand would help!

Really difficult to do yourself.
Appreciate 0
      01-26-2019, 11:21 PM   #3
John H.
Lieutenant
John H.'s Avatar
United_States
230
Rep
455
Posts

Drives: 2014 535i XDrive
Join Date: Jun 2017
Location: The O.C.

iTrader: (5)

I discovered that having the piston fully compressed will give you some flexibility and space.

One option is to hook top, insert center tab, and then force bottom hook with a flathead screwdriver.

Second option is to install both hooks, and force the center tab by prying up, and pushing tab into place.

So, this is what I did...
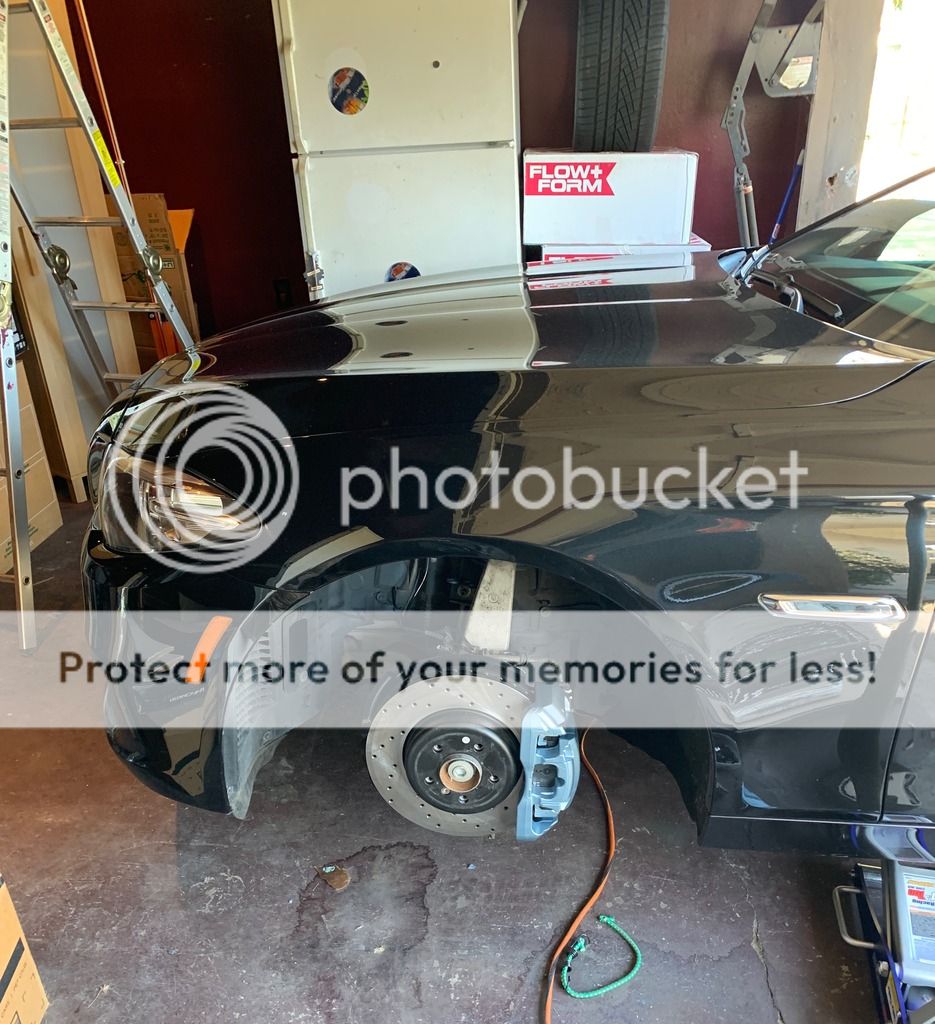


Rotors - StopTech
Dust Shield - VHT Primer, VHT Satin Black
Caliper/Mount - VHT Primer, VHT Titanium Silver Blue, VHT Clear
Rotor Set Screw - ECS Stainless
Pads - OEM BMW
Sensor OEM BMW
Rattle Clip - OEM BMW

Lotsa prep work. Took hours to clean. Used Dremel, wire brush, brake clean, etc... Happy with results; however, will go back in a week to touch up a few spots.

In the near future, I'll take better pictures to post.

Special thanks to Member Tallest for inspiring me to do this. His post can be found at: https://f10.5post.com/forums/showthread.php?t=1466735

Last edited by John H.; 01-28-2019 at 12:22 PM.. Reason: Added info.
Appreciate 0
      01-27-2019, 09:56 AM   #4
NinetyEight740
Major General
NinetyEight740's Avatar
United_States
231
Rep
5,691
Posts

Drives: 2 - 2013 535i msport
Join Date: Nov 2008
Location: Orange County California

iTrader: (2)

Garage List
2010 E91  [0.00]
Patience. It isn’t easy and will test you.
Appreciate 0
      01-27-2019, 11:27 AM   #5
John H.
Lieutenant
John H.'s Avatar
United_States
230
Rep
455
Posts

Drives: 2014 535i XDrive
Join Date: Jun 2017
Location: The O.C.

iTrader: (5)

Appreciate 0
      01-28-2019, 09:23 AM   #6
etnsandman
Second Lieutenant
82
Rep
216
Posts

Drives: 2015 M5 Competition
Join Date: Jan 2018
Location: Maryville,TN

iTrader: (0)

Man those clips are a bear. I found going slow helped to. Ca't rush them os wham! One side will slip out and your back to square one.
Appreciate 0
      01-28-2019, 11:55 AM   #7
windowmaker
Private First Class
70
Rep
150
Posts

Drives: 2013 550i M Sport 6MT
Join Date: Jan 2018
Location: Washington State

iTrader: (0)

Get the two far clips in first, then twist using a flathead screwdriver. It was a pita.
Appreciate 0
      01-28-2019, 12:20 PM   #8
John H.
Lieutenant
John H.'s Avatar
United_States
230
Rep
455
Posts

Drives: 2014 535i XDrive
Join Date: Jun 2017
Location: The O.C.

iTrader: (5)

Quote:
Originally Posted by windowmaker View Post
Get the two far clips in first, then twist using a flathead screwdriver. It was a pita.
Copy. Thanks!

I forgot to mention that these are new clips, not as flexible as old.
Appreciate 0
      02-03-2019, 11:29 PM   #9
jaydiemm
New Member
8
Rep
20
Posts

Drives: F10
Join Date: May 2016
Location: norcal

iTrader: (0)

Quote:
Originally Posted by John H. View Post
I discovered that having the piston fully compressed will give you some flexibility and space.

One option is to hook top, insert center tab, and then force bottom hook with a flathead screwdriver.

Second option is to install both hooks, and force the center tab by prying up, and pushing tab into place.

So, this is what I did...


Rotors - StopTech
Dust Shield - VHT Primer, VHT Satin Black
Caliper/Mount - VHT Primer, VHT Titanium Silver Blue, VHT Clear
Rotor Set Screw - ECS Stainless
Pads - OEM BMW
Sensor OEM BMW
Rattle Clip - OEM BMW

Lotsa prep work. Took hours to clean. Used Dremel, wire brush, brake clean, etc... Happy with results; however, will go back in a week to touch up a few spots.

In the near future, I'll take better pictures to post.

Special thanks to Member Tallest for inspiring me to do this. His post can be found at: https://f10.5post.com/forums/showthread.php?t=1466735
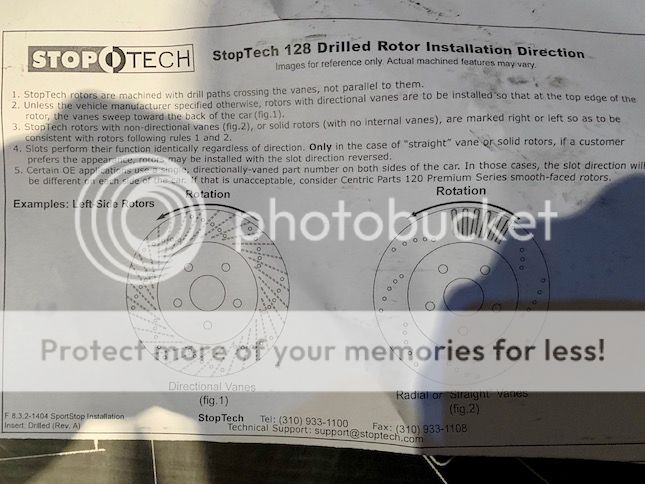
the caliper color looks good, you might want to double check the direction of the drilled rotors on the drivers side vs passenger side... is it reversed ??
Appreciate 1
John H.230.00
      02-04-2019, 12:11 PM   #10
John H.
Lieutenant
John H.'s Avatar
United_States
230
Rep
455
Posts

Drives: 2014 535i XDrive
Join Date: Jun 2017
Location: The O.C.

iTrader: (5)

Quote:
Originally Posted by jaydiemm View Post
the caliper color looks good, you might want to double check the direction of the drilled rotors on the drivers side vs passenger side... is it reversed ??
Hi Jay. Thanks for looking out! However, they are installed correctly. I even called Centric to confirm instructions.


Last edited by John H.; 02-04-2019 at 12:12 PM.. Reason: Added info.
Appreciate 0
      02-04-2019, 01:00 PM   #11
Sylverlee
Captain
150
Rep
965
Posts

Drives: White 535i M-Sport, 911 GTS
Join Date: Jul 2010
Location: Irvine

iTrader: (2)

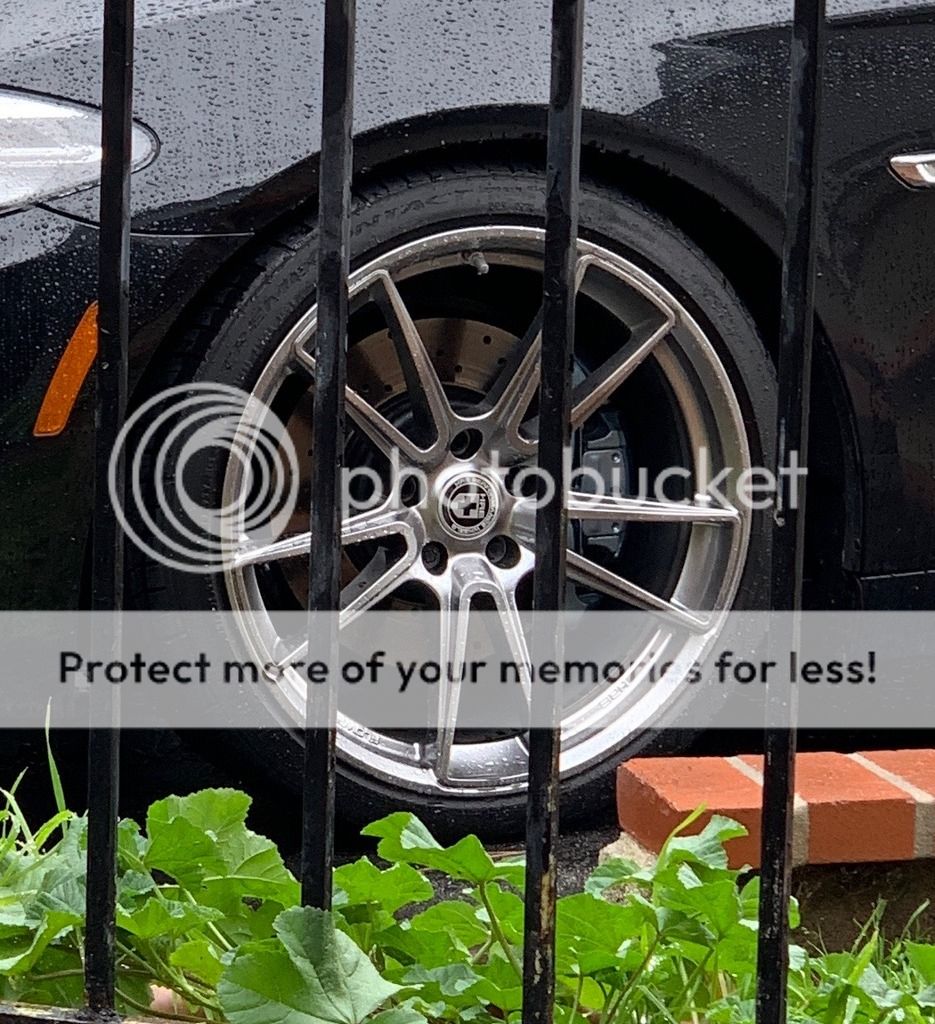
Nice wheels John!
Appreciate 0
      02-04-2019, 01:30 PM   #12
ezaircon4jc
Major General
ezaircon4jc's Avatar
United_States
4476
Rep
5,357
Posts

Drives: 2019 540i M Sport
Join Date: Jan 2015
Location: San Diego

iTrader: (0)

Quote:
Originally Posted by John H. View Post
Hi Jay. Thanks for looking out! However, they are installed correctly. I even called Centric to confirm instructions.

Be alert for micro-cracks from the holes. I had a few sets (I don't really remember the brands) and they all developed micro-cracks emanating from the bevels at the holes.
Appreciate 0
      02-04-2019, 01:39 PM   #13
John H.
Lieutenant
John H.'s Avatar
United_States
230
Rep
455
Posts

Drives: 2014 535i XDrive
Join Date: Jun 2017
Location: The O.C.

iTrader: (5)

Quote:
Originally Posted by ezaircon4jc View Post
Be alert for micro-cracks from the holes. I had a few sets (I don't really remember the brands) and they all developed micro-cracks emanating from the bevels at the holes.
Yes, have experienced such. Will monitor rotors.

My first set of StopTechs. Hopefully, they will hold up.
Appreciate 0
      02-04-2019, 01:41 PM   #14
John H.
Lieutenant
John H.'s Avatar
United_States
230
Rep
455
Posts

Drives: 2014 535i XDrive
Join Date: Jun 2017
Location: The O.C.

iTrader: (5)

Quote:
Originally Posted by Sylverlee View Post
Nice wheels John!
Hey, bro! You are to blame for my HRE wheel purchase! ;-). Hope all is well!
Appreciate 0
      02-27-2019, 10:00 PM   #15
kswieringa
Registered
0
Rep
2
Posts

Drives: 2014 BMW 535d
Join Date: Feb 2019
Location: California Coast

iTrader: (0)

Garage List
I just did a full brake job and caliper paint. That front clip is a huge PITA.
I had to take a break the first night. https://f10.5post.com/forums/images/smilies/mad0260.gif What worked was pushing the caliper tight against the outside of the rotor, then sliding the end tabs of the clip behind the caliper bracket while keeping the plate tight against the caliper. Then insert a screwdriver in the hole in the bracket while pushing in on the handle towards the rotor while pushing the hole end out towards where the rim of the wheel would be till the half moon tab slid in the groove.
Appreciate 0
      02-28-2019, 01:21 AM   #16
John H.
Lieutenant
John H.'s Avatar
United_States
230
Rep
455
Posts

Drives: 2014 535i XDrive
Join Date: Jun 2017
Location: The O.C.

iTrader: (5)

Quote:
Originally Posted by kswieringa View Post
I just did a full brake job and caliper paint. That front clip is a huge PITA.
I had to take a break the first night. https://f10.5post.com/forums/images/smilies/mad0260.gif What worked was pushing the caliper tight against the outside of the rotor, then sliding the end tabs of the clip behind the caliper bracket while keeping the plate tight against the caliper. Then insert a screwdriver in the hole in the bracket while pushing in on the handle towards the rotor while pushing the hole end out towards where the rim of the wheel would be till the half moon tab slid in the groove.
Thanks for the reply. I found it most easy by doing the following: hooking one end, set center tab in......then, while pressing center of clip with one hand, use other hand to grab the unmounted end with a pair of needle nose LOCKING pliers, flex it over the caliper mount edge. This method does the least damage to a painted caliper, and seems to be the quickest way. Again, LOCKING needle nose pliers.


Last edited by John H.; 02-28-2019 at 10:58 AM.. Reason: Added info. Tool rec.
Appreciate 1
      03-02-2019, 07:25 AM   #17
sesh1957
Private First Class
United_States
34
Rep
123
Posts

Drives: 2012 535i xdrive
Join Date: Jun 2009
Location: North Haven, CT

iTrader: (0)

Power Stop Kit installation

Nice, Powerstop installs in the opposite rotation, interesting, this is tagged passenger. The slots move water outboard.
Attached Images
 
Appreciate 1
John H.230.00
      06-26-2019, 08:52 AM   #18
tkalka17
Registered
0
Rep
1
Posts

Drives: 2013 BMW 550i
Join Date: Jun 2019
Location: Boynton Beach, Florida

iTrader: (0)

Link to Anti-rattle clip

Hi, new to this forum. Going off of this thread, can anybody send a link to the anti-rattle clip online? Mine has fallen off when doing the front brakes and I need to get a replacement.
Appreciate 0
      06-26-2019, 02:00 PM   #19
rahdigga165
Enlisted Member
13
Rep
38
Posts

Drives: 2015 535i xdrive M-Sport
Join Date: Jun 2018
Location: NYC

iTrader: (1)

Quote:
Originally Posted by tkalka17 View Post
Hi, new to this forum. Going off of this thread, can anybody send a link to the anti-rattle clip online? Mine has fallen off when doing the front brakes and I need to get a replacement.
Realoem.com is going to be your best friend..you can do shopping on fcpeuro or ectunning. Part number might be 34116799386 and part only cost 20 bucks in fcpeuro..again cross reference your vehicle in realoem.
Appreciate 0
      06-26-2019, 07:25 PM   #20
John H.
Lieutenant
John H.'s Avatar
United_States
230
Rep
455
Posts

Drives: 2014 535i XDrive
Join Date: Jun 2017
Location: The O.C.

iTrader: (5)

Quote:
Originally Posted by ezaircon4jc View Post
Be alert for micro-cracks from the holes. I had a few sets (I don't really remember the brands) and they all developed micro-cracks emanating from the bevels at the holes.
Have been monitoring the rotors. Nothing unusual to report. Has held up very well. StopTech/Centric rotors are solid.
Appreciate 0
      05-30-2022, 05:48 AM   #21
AussieBob
Private
80
Rep
92
Posts

Drives: 2010 F10 "M5"
Join Date: Sep 2018
Location: Australia

iTrader: (0)

Good bloody Lord these clips are really difficult, the worst BMW model I have ever had to deal with for brake pad changes. It has to be the worst anti-rattle clip design. I can see why aftermarket calipers are an option.

I used your first described method john H. and got the clip in three times before I was happy with how it lined up and gave it a road test. I used needle nose pliers, simliar to you, to bend and force the bottom clip in. If I see a huge long set in the future I think I will invest in it.

It is a great joy that the rear calipers don't have these awful awful clips.

New paint and decals are going on the calipers once I clear my head again. Why does BMW use this horrible design? What are the benefits, if any?

Last edited by AussieBob; 05-30-2022 at 06:10 AM..
Appreciate 0
      05-30-2022, 07:51 AM   #22
bk_mike
|
United_States
76
Rep
173
Posts

Drives: F10 550ix
Join Date: Jun 2010
Location: New York

iTrader: (2)

I used a couple of zip ties on each side to keep the clip in place. Still a PITA but it kept it from flying across the garage.
Appreciate 0
Post Reply

Bookmarks


Posting Rules
You may not post new threads
You may not post replies
You may not post attachments
You may not edit your posts

BB code is On
Smilies are On
[IMG] code is On
HTML code is Off


All times are GMT -5. The time now is 02:14 AM.


5post
Powered by vBulletin® Version 3.8.11
Copyright ©2000 - 2024, vBulletin Solutions Inc.
1Addicts.com, BIMMERPOST.com, E90Post.com, F30Post.com, M3Post.com, ZPost.com, 5Post.com, 6Post.com, 7Post.com, XBimmers.com logo and trademark are properties of BIMMERPOST